

Adobe recommends completing global adjustments, denoising, and healing in Lightroom before moving to Photoshop. This RAW-first approach preserves maximum image data and prevents computational bottlenecks that degrade quality. The correct sequence: denoise → lens corrections → exposure → healing → masking → sharpening.
Introduction
You open Lightroom. You adjust exposure. Then you notice sensor dust. So you heal it. But wait—should you have healed before adjusting exposure? Does the order even matter?
It does. Adobe’s RAW processing engine applies your edits in a fixed pipeline regardless of slider sequence, but the timing of your decisions directly impacts image quality and performance. Move a Dehaze slider after healing, and you’ll reveal new artifacts that force you to heal again. Apply sharpening before denoising, and you’ll amplify the noise you’re trying to eliminate.
This guide breaks down Adobe’s official workflow for Lightroom and Photoshop. You’ll learn why certain steps must happen in sequence, when to transition between programs, and how to avoid the quality traps that force you to start over.
The RAW Foundation: Why Lightroom Comes First
Lightroom and Adobe Camera Raw (ACR) share identical processing engines. Both are non-destructive parametric editors, meaning they store your adjustments as instructions rather than altering pixels directly.
Adobe’s primary recommendation: complete as much work as possible in the RAW environment before touching Photoshop. RAW files contain 12-14 bits of tonal data per channel—thousands of brightness levels your camera recorded. Once you export to Photoshop as a TIFF or PSD, you’re working with rendered pixels that offer far less flexibility for extreme exposure or color corrections.
The Bottom Line: RAW files are like uncooked ingredients with maximum flavor potential. Photoshop works with the finished dish—still editable, but you can’t unbake a cake.
The Core Sequence: Adobe’s Recommended Order of Operations
The order you move Lightroom sliders doesn’t change how the engine processes them—Adobe’s pipeline is fixed. However, for visual accuracy and performance stability, Adobe recommends this sequence:
Step 1: AI Denoise and Lens Corrections
Apply AI Denoise first. It creates a clean foundation for AI masking tools and healing brushes that follow. Denoising after masking forces the algorithm to recalculate its noise model, which reduces effectiveness.
Enable Lens Profile Corrections next to fix geometric distortion and vignetting. You need an accurate image canvas before making tonal or healing decisions.
Step 2: Global Adjustments (The “Basic” Panel)
Set White Balance first—it affects how all subsequent color edits behave. Then adjust Exposure, Highlights, Shadows, and Blacks to establish your tonal foundation.
This step must precede healing. Brightening a dark photo often reveals sensor dust or blemishes that were invisible at base exposure. If you heal first, you’ll heal again after global adjustments uncover new spots.
Step 3: Healing and Spot Removal
With exposure locked, use the Healing Brush or Clone Stamp to remove distractions. The tool’s content-aware algorithm samples surrounding pixels to blend the repair. If you heal at base exposure and then brighten the image, the sampled pixels won’t match the final tonality.
The healing math works best when it references pixels that have the same tonal ranges as the finished image.
Step 4: Masking and Local Adjustments
Use Select Subject, Select Sky, or Linear Gradients to refine specific zones. These AI tools analyze pixel relationships across the entire frame. Running them before global adjustments means they’re analyzing darker, noisier data, which reduces accuracy.
Step 5: Creative Color Grading
Apply HSL/Color Mixer adjustments and Color Grading panels now. These tools shift hue relationships and introduce stylistic looks. They work more predictably when applied to tonally balanced images.
Step 6: Detail Panel (Sharpening)
Keep sharpening near the end of your RAW workflow. Sharpening amplifies edge contrast—if you sharpen noisy pixels, you’ll enhance the noise. Denoise first, sharpen last.
The Bottom Line: Sharpening is like turning up the volume. If there’s static in the recording (noise), you’ll make the static louder too.
Why This Order Matters: The Technical Logic
“The sequence isn’t arbitrary—it’s optimized for how sensors capture light and how software processes that data.”
Adobe’s sequence addresses two performance realities:
The “Reveal” Effect
Tonal adjustments like Dehaze, Whites, and Shadows uncover hidden artifacts. If you heal a sensor dust spot at base exposure and then apply Dehaze, the haze algorithm may reveal new spots or create halos around your healing work.
This forces you to toggle the Healing layer visibility, find the new spots, and heal again. The correct sequence eliminates this loop.
Computational Load Management
AI-based tools (Denoise, Select Subject, and Remove Background) demand significant GPU and RAM resources. Running them early ensures lighter edits (Curves, HSL adjustments) don’t trigger re-computation of the heavy AI math every time you move a slider.
Lightroom’s processing engine queues edits. When you adjust a slider after AI operations, the software must partially reprocess the AI layer to preview your change. Front-loading the AI work minimizes these recalculations.
The Bottom Line: Heavy lifting first, detail work second. You wouldn’t renovate a house’s foundation after installing the drywall.
“Lightroom develops the digital negative. Photoshop manipulates the reality within it.”
The Transition: When to Move to Photoshop
Move to Photoshop only when Lightroom reaches its creative ceiling. Open in Photoshop as a Smart Object if you think you might need more editing. This will increase the file size in Photoshop. I often skip this as my tonal and color edits in LR/ACR are usually done, as most of my final color comes from contrast edits I make in Photoshop, so I choose Edit in Adobe Photoshop (Ctrl/Cmd + E) to ensure seamless file hand-off.
Adobe recommends Photoshop for:
- Complex Retouching: Removing large objects or performing pixel-level skin work that requires frequency separation
- Compositing: Blending multiple exposures or creating panoramas with advanced masking
- Typography and Graphics: Adding text overlays or design elements that Lightroom can’t handle
- Precision Masking: Using the Pen Tool or Channels for selections, Lightroom’s AI can’t achieve
The Photoshop Protocol: Maintaining Non-Destructive Workflows
Once in Photoshop, the workflow shifts from parametric sliders to pixel-based layers. Adobe’s core recommendation: preserve flexibility.
Use Smart Objects for RAW Flexibility
Open images as Smart Objects if you anticipate changing RAW settings later. This embeds the original RAW file inside your Photoshop document. Double-click the Smart Object layer to reopen Adobe Camera Raw without quality loss.
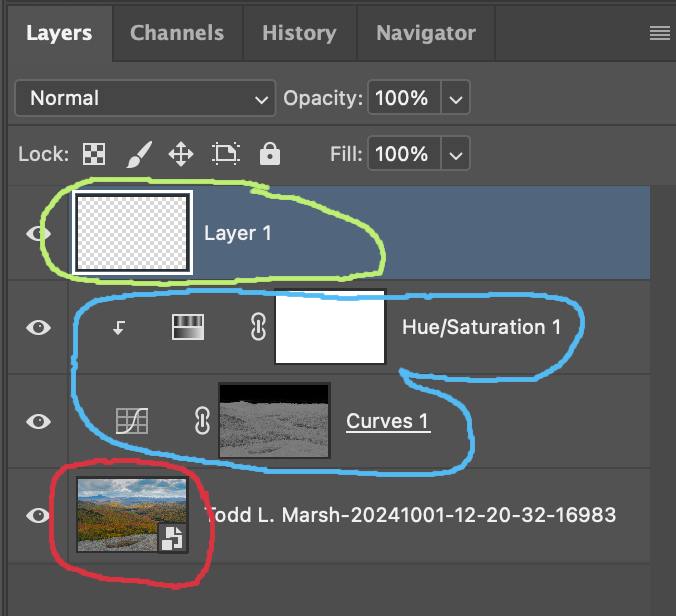
Layer-Based Healing Prevents Permanent Changes
Never heal directly on the Background layer. Create a new blank layer, set the Healing Brush to “Sample All Layers,” and heal on the blank layer. This keeps your corrections separate and reversible.
Adjustment Layers Over Destructive Edits
Avoid the Image > Adjustments menu—it permanently alters pixels. Use Adjustment Layers (Levels, Curves, Hue/Saturation) from the Adjustments Panel instead. These create editable layers you can mask, modify, or delete without touching the original.
I discuss this in detail in this article, explaining that Photoshop can be used Non-Destructively.
Output Sharpening as the Final Step
If you’re preparing for print, apply Output Sharpening last, sized for your final medium (glossy paper requires less sharpening than matte). Screen delivery needs different sharpening than print due to pixel density differences.
The Unified Approach: Adobe’s Core Philosophy
Adobe doesn’t recommend separate workflows for Lightroom versus Photoshop. The company advocates a RAW-first pipeline:
- Lightroom/ACR: Develop the digital negative—correct light, color, and lens distortion
- Photoshop: Manipulate pixels—change compositional reality through advanced retouching and compositing
This division ensures you extract maximum tonal and color data from RAW files before committing to pixel-based edits that offer less latitude.
I have written a couple of articles about RAW data, what it is, how it is collected, and how it differs from what our eyes see, and how our editing software interprets the RAW camera data. Here are links to those articles.
There Is No Such Thing as Looking at a RAW Image
How Lightroom, ACR, and Photoshop Work With Image Data
What Is Demosaicing and How Cameras Interpret Light Differently From the Human Eye
How Adobe Lightroom, Capture One, DxO, and Luminar Neo Interpret RAW Data
Common Workflow Mistakes to Avoid
Sharpening before denoising amplifies noise patterns, creating a gritty texture instead of clean detail.
Healing before exposure adjustments forces double work when tonal changes reveal new artifacts.
Skipping Lens Corrections causes healing and masking tools to misalign with actual subject boundaries.
Using Image Adjustments in Photoshop destroys pixel data permanently—always use Adjustment Layers.
Practical Application: A Real-World Example
You photograph a landscape at dusk. The image is underexposed with visible noise. Here’s how Adobe’s sequence applies:
- AI Denoise: Run first to eliminate the high-ISO grain from low light
- Lens Corrections: Enable profile to correct wide-angle distortion
- Exposure +1.5 stops: Brightening reveals sensor dust on the sky
- Healing Brush: Remove dust spots now that they’re visible
- Linear Gradient: Darken the bright sky using a mask
- HSL adjustments: Shift blue tones toward teal for a creative look
- Sharpening: Apply as the final RAW step to enhance tree detail
- Export to Photoshop as Smart Object: Remove a distracting power line using Content-Aware Fill
- Final Output Sharpening: Prepare for 16×20 print on luster paper
This sequence maximizes quality at each decision point and prevents the need to backtrack.
Conclusion: Quality Through Sequence
Adobe’s Lightroom-to-Photoshop workflow isn’t about rigid rules—it’s about understanding why certain operations depend on others. Denoise before sharpening because sharpening amplifies noise. Adjust exposure before healing because brightness reveals hidden artifacts. Move to Photoshop only when you need pixel manipulation that RAW processors can’t achieve.
Master this sequence, and you’ll spend less time fixing mistakes and more time refining your creative vision. Your images will hold more detail, your edits will run faster, and you’ll avoid the quality degradation that comes from processing pixels in the wrong order.
Actionable Takeaways:
- Apply AI Denoise before any other edit to establish a clean processing foundation
- Set global exposure before healing to reveal all artifacts at once
- Keep sharpening last in your RAW workflow to avoid amplifying noise
- Use Smart Objects in Photoshop to preserve the option to return to RAW settings
- Apply output sharpening only after all creative edits are complete
FAQ: Lightroom to Photoshop Workflow
Q: Does the order of Lightroom sliders change how the image is processed?
A: No. Adobe’s processing engine applies edits in a fixed pipeline regardless of slider sequence. However, the timing of your adjustments affects visual accuracy and performance.
Q: Should I sharpen in Lightroom or Photoshop?
A: Apply creative sharpening in Lightroom as one of your final RAW steps. Reserve Photoshop sharpening for output-specific needs (print vs. screen).
Q: When should I use Smart Objects versus regular layers?
A: Use Smart Objects when you might need to adjust RAW settings after the fact. If you’re doing heavy cloning or painting, regular layers render faster.
Q: Can I skip Lightroom and do everything in Photoshop’s Camera Raw?
A: Yes—ACR and Lightroom share the same engine. Choose based on whether you need catalog management (Lightroom) or standalone editing (ACR in Photoshop).
Q: What’s the penalty for healing before adjusting exposure?
A: You’ll likely heal twice. Brightening underexposed areas reveals sensor dust and blemishes that were invisible at base exposure, forcing you to redo healing work.
References
Adobe Systems. “Lightroom Classic: Recommended Order of Adjustments.” Adobe Help Center. https://helpx.adobe.com/lightroom-classic/help/develop-module-workflow (2024)
Adobe Systems. “Denoise Performance and AI Workflow Optimization.” Adobe Blog. https://blog.adobe.com/en/publish/2023/04/12/ai-denoise-workflow-recommendations (2023)
Schewe, J. “The Digital Negative: RAW Image Processing in Lightroom, Camera Raw, and Photoshop.” Peachpit Press (2023)
Understanding the Adobe Camera Raw Processing Pipeline
https://helpx.adobe.com/camera-raw/using/introduction-camera-raw.html
Adobe Systems. “Photoshop: Best Practices for Non-Destructive Editing.” Adobe Help Center. https://helpx.adobe.com/photoshop/using/nondestructive-editing.html (2024)