
How Each Tool Shapes Your RAW Images Differently
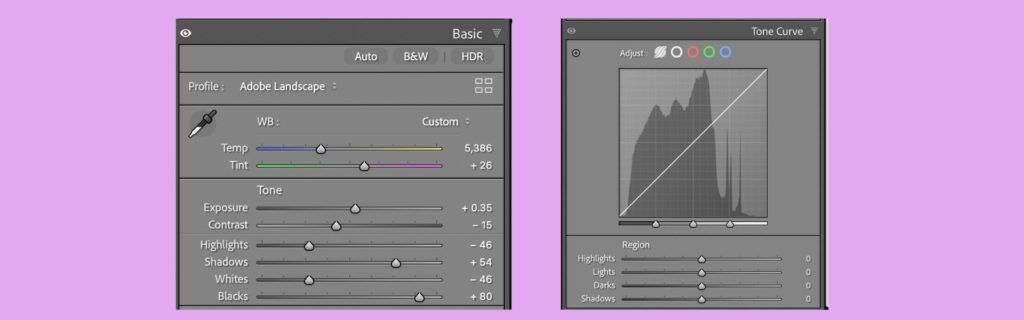
When you open a RAW file in Lightroom or Adobe Camera Raw, you have two fundamental ways to control how bright or dark different parts of your image appear: the familiar sliders in the Basic panel, and the Parametric Tone Curve.
Both tools affect exposure, contrast, highlights, shadows, whites, and blacks. But they work in fundamentally different ways, and understanding this difference will transform how you approach your edits.
*Note: I have created a video to show you the differences between moving sliders in the basic panel and making adjustments in the tone curve panel. The video can be found further down in the text.
Starting Point: Linear RAW Data
Before you touch any slider or curve, Lightroom is working with linear sensor data—the unprocessed information your camera captured. This data has enormous highlight latitude, delicate shadow information, and a tonal distribution that doesn’t yet match how our eyes perceive light.
Every adjustment you make is essentially remapping this linear light data into something that looks right to us. The question is: which tool gives you more control over that remapping?
I have a series of articles on how cameras capture RAW data, how cameras affect the data, the differences in how each editing software company manipulates the RAW data, and how the RAW process differs from how our eyes interpret the scene. Click here to see an article with links to all RAW data posts.
How the Basic Panel Sliders Work
The Basic panel sliders are designed to be intuitive, protective, and fast. Each slider targets a broad tonal range that Adobe has predefined, and the transitions between these ranges blend automatically.
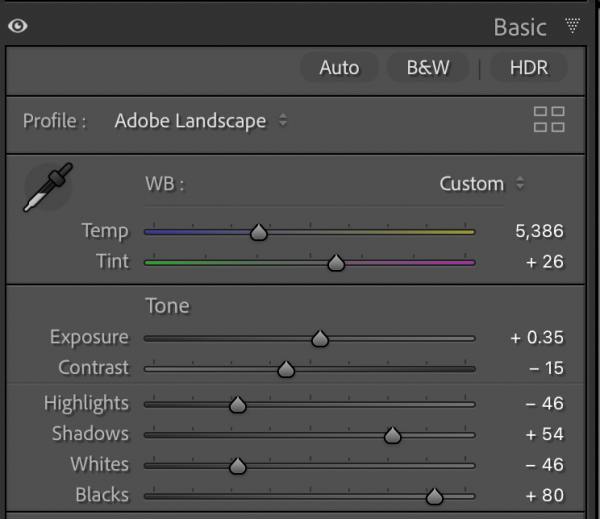
Here’s what’s crucial to understand: you don’t get to choose where these tonal boundaries fall. Lightroom chooses them for you.
Exposure
This slider affects the entire tonal range, but centers its adjustment on the midtones.
Move it right, and everything brightens—but midtones move most. Move it left, and everything darkens—again, with midtones leading the change.
Lightroom works hard to protect highlights and shadows from clipping while you make this global shift.
Highlights
This slider controls the upper bright tones below pure white, but within that range are several subranges: very bright highlights, mid-range highlights, and darker highlights.
When you pull the Highlights slider left to recover a bright sky, all three of these subranges drop together. You can’t selectively lower just the brightest highlights while leaving the mid-range highlights alone.
Furthermore, moving the highlight slider does affect the midtones, either stretching them out toward brighter tones or compressing them toward the shadows.
Lightroom makes that decision for you. There is no way to leave the midtones alone other than use another slider adjustment to bring them back.
Whites
This slider sets the extreme right edge of your histogram—essentially determining where clipping begins. It affects all very bright pixels as a group.
You can’t isolate and brighten only the most specular highlights without also affecting everything else in that range.
Moving the slider to the right mostly affects the brightest pixels at first. But move it far enough and even the midtones will increase in brightness. Interestingly, the majority of the midtones are not affected when moving the slider to the left.
Shadows
Like Highlights, this slider controls a range that contains multiple subranges: near-black shadows, mid-shadows, and lighter shadows.
When you lift the Shadows slider to open up dark areas, all of these subranges rise together. Lightroom applies noise control logic and tries to protect true blacks from turning muddy gray. But you can’t lift just the mid-shadows without also lifting the deeper ones.
Blacks
This slider determines where clipping to black begins, affecting the darkest tones as a group and influencing the overall depth and “anchoring” of your image. Again, you’re moving the entire region together.
The Core Limitation
When you move any Basic panel slider, you’re adjusting an entire tonal region and all of its internal subranges as one unit. You don’t get granular control over which parts of that region move more or less.
Maybe even more troubling is that it can affect other unrelated tonal regions. There is no way to decrease or stop other regions from being affected.
This is where the Parametric Tone Curve becomes fundamentally different.
What Makes the Tone Curve Different
The Parametric Tone Curve also divides your image into tonal regions—Highlights, Lights, Darks, and Shadows. But instead of simply pushing these regions up or down, the curve reshapes how they relate to one another along a continuous path, resulting in a more natural transition between the tonal regions.
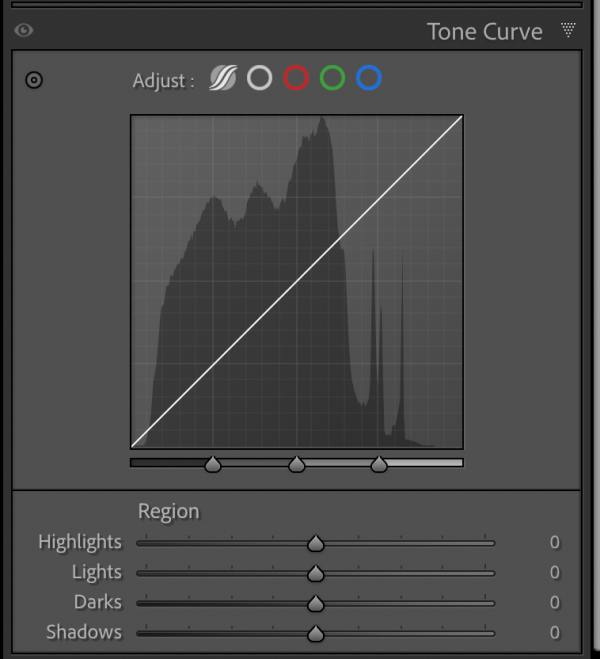
You’re no longer moving a bucket of tones. You’re bending a line that maps input brightness to output brightness.
Continuous Mapping vs. Regional Adjustment
With the Basic panel, regions move independently while Lightroom handles the transitions and keeps internal subranges locked together.
With the Parametric Curve, tones are remapped along a continuous slope. You control where the curve bends, and this means subranges inside each region can move differently relative to each other.
Although the Parametric Curve can start to adjust the nearest pixels in adjacent regions, you can switch to the point tone curve and add stops so that a much narrower region can be adjusted without greatly affecting adjacent regions.
Example: Lifting Shadows
Using the Shadows slider: Near blacks, mid-shadows, and light shadows all lift together in equal proportion.
Using the Tone Curve shadow region: You can shape the curve so that deep shadows barely move, mid-shadows move moderately, and light shadows move the most.
This kind of graduated control is impossible with the slider alone.
Example: Controlling Highlights
Using the Highlights slider: All highlight subranges drop together as one unit.
Using the Tone Curve: You can compress only the very brightest highlights while leaving mid-range highlights relatively untouched, preserving sparkle while controlling blown-out areas.
Again, the slider can’t do this.
Why Curves Often Feel Smoother
Because the tone curve operates on continuous tonal relationships, transitions between regions are naturally more gradual.
Heavy-handed slider adjustments can sometimes create slight tonal flattening, loss of separation within a region, or that overly “processed” look.
The tone curve, by contrast, maintains smooth gradations, preserves separation inside tonal regions, and produces more natural highlight and shadow roll-off.
Basic Panel vs. Tone Curve Example Video
So Which Tool Is More Precise?
The answer depends on what you’re trying to do.
The Basic panel is more precise for:
- Setting overall exposure
- Recovering extreme highlights or shadows
- Making fast, broad corrections
The Parametric Tone Curve is more precise for:
- Shaping contrast relationships
- Controlling how tones transition into each other
- Creating smooth, natural-looking tonal gradations
- Isolating subranges within broader tonal regions
How This Changes Your Editing Workflow
If you rely only on sliders, Lightroom decides how your tones blend together. You’re correcting exposure and contrast, and you’ll get good results—but with less intentional control.
If you use the tone curve after making basic slider corrections, you take control of the tonal relationships yourself. Your contrast becomes deliberate, your highlights and shadows feel smoother and more natural, and your edits become more consistent and repeatable across similar images.
The Bottom Line
Sliders adjust where tones live. The tone curve controls how tones relate.
Sliders are corrective tools—perfect for getting your image into the right ballpark. The tone curve is a tonal design tool—ideal for refining those relationships with precision.
Sliders adjust where tones live.
The tone curve controls how tones relate.
Sliders are corrective tools.
The tone curve is a tonal design tool.
And when it comes to creating smooth, natural transitions and precise control over tonal subranges, the Parametric Tone Curve is the more powerful and more precise instrument inside Lightroom and ACR.
When you want smooth, natural transitions and precise control over the subtle variations within your highlights, midtones, and shadows, the Parametric Tone Curve is the more powerful and sophisticated instrument in your Lightroom toolkit.
Have a Question? Want to see more Examples?
Leave a comment below, and I’ll answer your questions or show you more specific examples so you can see for yourself the differences between these two tools in Lightroom and Adobe Camera Raw. Or, in reality, any editing software program that uses sliders.

