

Non-destructive editing in Photoshop means your original photo stays untouched while you make unlimited changes. Adjustment layers store instructions instead of permanently altering pixels, giving you complete creative freedom to modify, remove, or refine any edit at any time—even months after you save the file. This approach preserves maximum image quality and lets you explore creative directions without fear of ruining your work.
Introduction
Don’t be the photographer in the cover image who just spent thirty minutes perfecting a color grade of his sky in Photoshop and then thinks,”Will it be better if it’s a warmer color?” He has been working destructively, and now he is starting over. If he built a non-destructive workflow, he’d be adjusting only one slider.
The difference between these two scenarios (destructive versus non-destructive isn’t just about convenience—it’s about preserving image quality through every revision.
When you apply edits directly to your pixels, you’re permanently burning those changes into the photo. Make a mistake three steps ago? You’ll lose data trying to fix it.
But when you work with adjustment layers, your original photo remains pristine underneath every change you make.
This guide breaks down exactly how non-destructive editing works:
- Why your 16-bit workflow depends on it, and when the “proper” approach actually slows you down.
- You’ll learn the technical mechanics behind pixel degradation and how to structure your layer stack to prevent cascading errors.
- And the practical situations where merging everything into one layer is the smarter choice.
How Non-Destructive Editing Works: Instructions vs. Pixel Surgery
What Are Pixel Layers and Adjustment Layers?
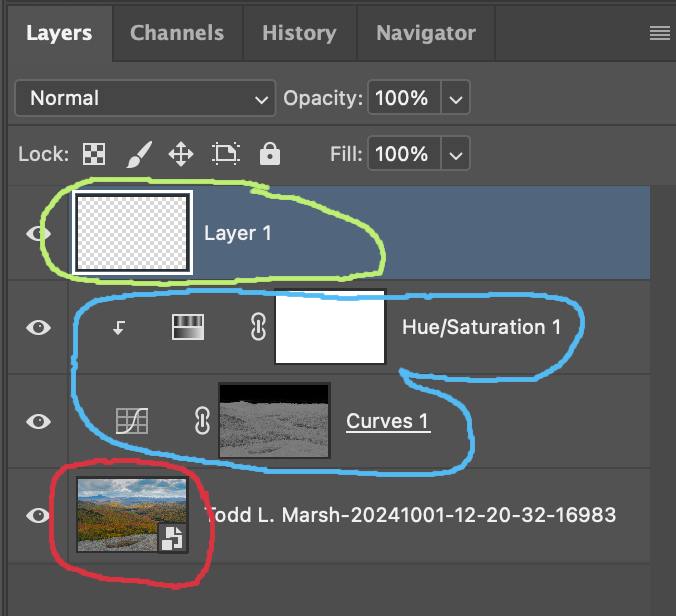
Before diving into workflows, you need to understand the two fundamental layer types in Photoshop. Refer to this image and the colored circles as described in the text.
Pixel Layers
A pixel layer contains actual image data—the red, green, and blue values that make up your photograph. When you import a photo into Photoshop, it arrives as a pixel layer. When you paint with the Brush tool, clone with the Clone Stamp, or use the Eraser, you’re working with pixels. These are the building blocks of your image.
Pixel layers can be:
- Your original imported photograph
- A blank layer where you paint or retouch
- A duplicate copy of your image
- A Smart Object (which protects the pixel data inside a container) is denoted by the icon in the bottom-right corner of the layer thumbnail (red circle in the image above).
- Pixel layers do not have masks attached when created (unless you add them yourself). See the red and green circles on the Photoshop panel image above.
Adjustment Layers
An adjustment layer contains zero pixels. Instead, it stores mathematical instructions that transform the layers below it. When you create a Curves adjustment layer, you’re not creating image data—you’re creating a formula that says “remap these brightness values according to this curve.”
Common adjustment layer types include:
- Curves (tonal adjustments)
- Levels (brightness and contrast)
- Hue/Saturation (color shifts)
- Color Balance (targeted color adjustments)
- Exposure (brightness control)
- When created, adjustment layers automatically add masks to the layer. These can be see-all white masks, hide-all black masks, or mixed-gray masks such as luminosity masks. See the blue circle in the image above.
The Critical Difference:
Pixel layers ARE the image. Adjustment layers MODIFY how you see the image. One contains data; the other contains instructions for transforming that data (very similar to how Lightroom works). This distinction is the foundation of non-destructive editing.
What “Destructive” Actually Means
When you click Image > Adjustments > Levels in Photoshop, you’re telling the software to do math directly on your pixel data and replace the original numbers with new ones. That’s it. The old information is gone.
Here’s what happens under the hood: your image is made of numbers that represent brightness and color. An 8-bit image uses values from 0 (pure black) to 255 (pure white). When you brighten the image, Photoshop recalculates those values—maybe moving a pixel from 128 to 160—and overwrites the original number.
*Note: We work with 16-bit images, but digital imaging was standardized on the 8-bit scale, and we still talk in those terms, but Photoshop is using the larger numbers and dumbing it down for us. Here is an article that explains that.
In Plain English: Think of it like painting over a wall. Once the new paint is dry, you can’t get the original color back without scraping down to the sheetrock.
The problem compounds when you change your mind. If you try to “undo” a brightening adjustment by darkening the image again, you’re not restoring the original data—you’re doing a second round of math on already-modified numbers. Each transformation introduces rounding errors, and you lose tonal detail every time.
How Adjustment Layers Change the Game
An adjustment layer doesn’t touch your pixels at all. It sits above your photo in the layer stack and stores a set of instructions: “Make everything 20% brighter” or “Shift reds toward orange by 15 degrees.”
When Photoshop renders your image on screen, it reads these instructions and applies them in real-time to the pixels below. Your original photo layer remains completely unchanged. You can toggle the adjustment layer off, delete it entirely, or modify its parameters a hundred times without any quality loss.
In Plain English: It’s like sticky notes on a document instead of writing on the page. Peel off the notes, and your original is untouched.
Why This Matters for Your Workflow
Since you’re working in 16-bit from RAW files, you have massive tonal precision—65,536 values per channel instead of the 256 values in 8-bit JPEGs. Adjustment layers preserve that precision because they never touch your original data. Direct adjustments, even in 16-bit, compound rounding errors with each edit. The difference might be invisible after one change, but after ten revisions? You’ve degraded a high-resolution file down to 8-bit quality through repeated math operations on the same pixels.
This is why layer stack organization matters. Get the structure right, and you can revise extensively without visible quality degradation.
Building a Bulletproof Layer Stack
The Bottom-Heavy Pixel / Top-Heavy Adjustment Model
Here’s the optimized structure:
Layer 1 (Bottom): Smart Object Base
Import your photo as a Smart Object. This lets you access Camera Raw adjustments—exposure, white balance, lens corrections—at any point in your workflow without starting over.
Layer 2: Pixel Retouching Layer
Create a blank layer for cleanup work or filter adjustments. This sits directly above your base, keeping retouching separate from adjustments. Any adjustment layers you add later will automatically affect these retouched pixels.
Layers 3+: The Adjustment Stack
Place all global tonal and color adjustments at the top of the stack. Because these are just instructions, you can modify them endlessly without touching the pixel work below.
This structure means you can change your mind about color grading at any time without redoing any of your cleanup work.
Here is an article that explains Adobe’s preferred adjustment workflow. This generalized workflow shouldn’t be different if you work with other editing software.
The Built-In Masking Advantage
Every adjustment layer includes a layer mask automatically. This is massive for selective editing.
Want to add contrast only to the foreground rocks? Apply a Curves adjustment layer and paint black on the mask everywhere except the rocks. Need to adjust the sky without touching the foreground? Gradient mask on a Hue/Saturation layer.
With direct adjustments, you’d need to create selections first or duplicate your entire layer multiple times—both workflows that bloat file size and create organizational chaos.
Note on Clipping Masks: Like adjustment layers, clipping masks are non-destructive. They allow you to apply an adjustment layer to only the layer directly below it, rather than affecting all layers beneath. This gives you precise control without permanently altering pixels.

Smart Filters: Non-Destructive Effects
Smart Filters are the non-destructive version of Photoshop’s filter gallery. When you convert a layer to a Smart Object and apply a filter, that filter becomes a Smart Filter—an editable effect that sits below the layer with its own mask.
Unlike traditional filters that permanently alter pixels, Smart Filters can be toggled on/off, have their settings adjusted, or be deleted entirely without affecting the original image data. This applies to filters like Gaussian Blur, Sharpen, Camera Raw Filter, and most third-party plugins when applied to Smart Objects.
The trade-off: Smart Filters increase file size and processing demands, similar to Smart Objects. They’re essential for maintaining flexibility but can slow performance on complex files.
Smart Filters and their advanced applications will be discussed in detail in a future article.
When Non-Destructive Editing Fails You
The Performance Tax
Here’s what the tutorials don’t tell you: every adjustment layer and Smart Object makes Photoshop work harder in real-time. Performance issues typically occur when using more than 20 layers (though this depends heavily on your computer’s specifications—RAM, processor speed, and whether you’re using an SSD). Files with many layers can become a slideshow. Brush strokes lag. Filters take minutes to preview.
Large Smart Objects are even worse. A 50-megapixel RAW file converted to a Smart Object can create multi-gigabyte PSD files that crawl during saves and eat your hard drive.
Sometimes flattening layers in Photoshop isn’t sloppy—it’s professional.
As a side note, on my computer, I also notice a huge performance tax as the masks build up in Lightroom Classic. Adobe Camera Raw doesn’t seem to slow my machine down nearly as much as Lightroom does.
The “Sample All Layers” Trap
The common advice is to work on blank layers using “Sample All Layers” mode for your retouching tools. This sounds perfect until you realize the problem: your tools sample the entire visible stack, including active adjustment layers.
If you have a warming filter and a contrast boost active at the top of your layer stack, your Clone Stamp will sample those adjusted colors and burn them into your retouching layer as permanent pixels. Now those pixels won’t respond correctly when you later change the adjustment layers.
The fix: Use “Sample: Current & Below” instead. The “current” layer is the one you’re actively working on, and “below” refers to all layers beneath it in the stack. Set your Clone Stamp and Healing Brush to this mode, work on a blank layer directly above your base image, and place adjustment layers above the retouching layer. This way, your tools only sample the clean base pixels and your retouching work, never the adjustment instructions. The adjustments affect everything below them in the preview, but they don’t contaminate your source sampling.
Tools That Require Pixel Layers
Some of Photoshop’s tools require completed pixel data to analyze and manipulate:
- Content-Aware Fill
- Remove Tool
- Transform tool (for warping/distorting, though basic transforms work on Smart Objects)
- Most third-party plugins (Nik Collection, Topaz, etc.)
Note that painting and retouching tools (Brush, Clone Stamp, Healing Brush, Dodge/Burn, Blur) CAN work non-destructively on blank layers when you use “Sample: Current & Below” mode, as explained earlier in the sampling section.
These tools require actual pixel data to analyze and manipulate. Your options are: duplicate your entire image stack (file size explosion), create a “Stamp Visible” merged layer (technically destructive), or skip these tools entirely (limiting your creative options).
The “Stamp Visible” approach (Ctrl+Alt+Shift+E / Cmd+Opt+Shift+E) creates a new merged layer above your stack. You can delete this layer, and it won’t affect the layers below. Sometimes “Stamping” your stack is necessary, but I wait until near the end of the edit, that way if I need to change anything below, I only need to delete and redo the one layer. It’s best to do all of this type of work either first or last.
Decision Paralysis and Creative Flow
Some photographers know they can endlessly tweak every parameter, and many fall into revision hell. They’ll spend two hours micro-adjusting a single Curves layer instead of making a creative decision and moving forward.
Sometimes the best edit is the one you commit to and stop touching. Unlimited reversibility can become unlimited procrastination.
Balancing Non-Destructive and Destructive Editing
When to Go Fully Non-Destructive
Use the complete adjustment layer workflow when:
- You’re working with clients who request frequent revisions
- The final output format is unknown (print vs web requires different approaches)
- You’re learning and need the safety net
- File size and performance aren’t constraints
When to Work Destructively
Most Photoshop experts’ workflows aren’t purely non-destructive—they’re strategically destructive at key milestones. Use direct edits or merged layers when:
Performance demands it:
- You’re working on an older machine or with massive files that make the software lag
- The project has a tight turnaround, and you need speed over flexibility
Tools require it:
- You need to use Content-Aware Fill, the Patch Tool, or the Transform tool
- You’re using third-party plugins that require pixel layers (Nik Collection, Topaz, etc.)
Creative checkpoints:
- You’ve reached a stable point and want to lock in the work before moving to detail-heavy tasks
- You need to apply effects that only work on flattened pixels
The checkpoint workflow: Work non-destructively through major creative decisions, then create a Stamp Visible layer (Ctrl+Alt+Shift+E / Cmd+Opt+Shift+E) when you reach stability. Save a versioned copy of the file, work on the stamped layer for detail work, and keep the layered master as your archival version. This gives you creative flexibility during exploration and performance efficiency during execution.
Actionable Takeaways
Structure your layer stack with the “Bottom-Heavy Pixel / Top-Heavy Adjustment” model: Smart Object base, pixel retouching layer, adjustment stack at top. This prevents the upstream error cascade.
Use “Sample: Current & Below” instead of “Sample All Layers” for retouching tools. This keeps your pixel edits clean and separated from global adjustments.
Create versioned saves at creative checkpoints. Before you flatten or stamp visible, save the fully-layered file with a version number. You can always go back if the client changes direction.
Don’t let workflow dogma slow you down. If you need the Remove Tool or Transform tool, create a Stamp Visible layer and work on it.
FAQ
Q: Does using adjustment layers mean I never lose quality?
In a 16-bit workflow, adjustment layers preserve image quality far better than direct edits. Since they store instructions rather than modifying pixels directly, your original image data remains untouched. While stacking many adjustment layers can theoretically introduce rounding errors, in 16-bit, these occur far below the threshold of human perception. For practical purposes, you can stack multiple adjustments without visible quality degradation.
Q: Should I always import photos as Smart Objects?
Only if you need ongoing access to Camera Raw adjustments. Smart Objects increase file size and can slow performance. For quick edits where you won’t need to change RAW parameters, a standard pixel layer is fine.
Q: Can I use adjustment layers with the Clone Stamp tool?
Not directly—adjustment layers don’t contain pixels to sample from. Work on a blank layer above your base image with “Sample: Current & Below” enabled, then place adjustment layers above that retouching layer.
Q: What’s the fastest way to create a merged layer without flattening my file?
Use Stamp Visible: Ctrl+Alt+Shift+E (Windows) or Cmd+Opt+Shift+E (Mac). This creates a new merged layer at the top of your stack while keeping all your original layers intact.
Q: Will adjustment layers work with filters?
Some filters work as Smart Filters when applied to Smart Objects (which is non-destructive), but many require real pixel data. For those, you’ll need to apply them to a merged layer or a stamped copy.
References
- Non-Destructive Editing in Photoshop: Why You Should Use Smart Objects – Learning Curve Global
- Design 101: How to Work Non-Destructively In Photoshop – Red Branch Media
- Image Adjustments vs Adjustment Layers – Photoshop Essentials
- Non-Destructive Photo Editing With Adjustment Layers In Photoshop – Photoshop Essentials
- Destructive and Non-destructive Editing – Zoner Studio Help
- Destructive vs. Non-Destructive Editing Workflow – Capture Landscapes
- The Benefits Of Working With 16-Bit Images In Photoshop – Photoshop Essentials
- Adjustment and fill layers – Adobe Help Center
- Power of Adjustment Layers in Photoshop: Non-Destructive Photo Editing – PRO EDU
- The non-destructive workflow – Damien Symonds
- What is Non-Destructive Editing? – PHLEARN
- Advanced Retouching for Stunning Product Imagery – PRO EDU
- Photoshop Adjustments vs. Adjustment Layers: Improve Your Editing Workflow – Fstoppers
- Photoshop Basics: Adjustments vs Adjustment Layers – PHLEARN
- Do I lose information every time I add an adjustment layer to an 8-bit image? – Photography Stack Exchange
- Order of layers for complex pixel edits – Damien Symonds
- Is Your Processing Workflow Non-Destructive? – Photo Cascadia
- Photoshop Layer Management: How You Order Your PSD Layers Matters – Retouching Academy
- How to Use Stamp Visible Layer vs Flatten Image in Photoshop – SPS Photo
- Real non-destructive way of clonestamp tool in Photoshop – Graphic Design Stack Exchange