

Your Camera Counts Photons. Your Eyes Don’t. Here’s Why It Matters
Quick Answer: RAW files look flat because they contain unprocessed linear sensor data. Camera sensors measure light objectively—double the light, double the signal—but your eyes perceive brightness on a logarithmic curve. Gamma encoding bridges this gap by redistributing tonal information to match how you actually see.
Introduction
You open a RAW file, and it looks terrible. Flat. Dark. Lifeless. But the JPEG preview on the back of your camera looked great. What happened?
Nothing’s wrong. Your camera captured the data correctly. The problem is that RAW files store light measurements the way physics works, not the way your eyes work. This mismatch creates the flat appearance.
Understanding this difference transforms how you edit. You’ll know why Lightroom produces cleaner results than Photoshop for exposure work, why shadow noise can’t be fixed in post, and why “expose to the right” actually works. This article explains the physics behind RAW data, gamma encoding, and what it means for your editing workflow.
- Your Camera Counts Photons. Your Eyes Don't. Here's Why It Matters
- Introduction
- Your Camera Measures Light Differently Than You See It
- Why RAW Files Look Dark and Flat
- Gamma Encoding: Redistributing Information to Match Your Vision
- The CRT Legacy
- Why Noise is Worse in Shadows
- Editing in Lightroom vs. Photoshop: Different Math
- The Math Problem with Gamma-Space Editing
- The Workflow Rule
- Conclusion
- FAQ
- References

Your Camera Measures Light Differently Than You See It
Camera sensors operate on pure physics. When photons hit silicon, they knock electrons loose. The sensor counts those electrons. Double the photons, double the electrons. This linear response is mechanical precision.
Your eyes don’t work this way. You perceive brightness on a logarithmic curve. The visual difference between one candle and two candles looks similar to the difference between 100 candles and 200 candles. Your brain compresses the brightness range so you can see detail in both shadows and highlights simultaneously.
The Storage Problem
This mismatch creates an efficiency problem. If you stored sensor data exactly as captured, the file would waste most of its bit depth on tiny brightness differences in highlights that you can’t see. Meanwhile, shadows would get crushed into just a few values, and the color palette would look flat and poster-like.
An 8-bit file (jpeg) has 256 levels per channel. If those levels are distributed linearly as the sensor captures them, 128 levels get spent on the brightest 50% of the scene. Only 64 levels remain for the next quarter-stop down. Shadows get maybe 8-16 levels total. You’d see visible banding.
Why RAW Files Look Dark and Flat
RAW files contain linear sensor data—raw electron counts from each pixel. This data hasn’t been processed to match your eyes, so when you view it directly, several things happen.
It looks too dark because most captured information sits in the highlights. Your eye expects redistributed values with more information in midtones. The linear file doesn’t provide this.
It looks flat because no contrast curve has been applied. Linear data maps highlight detail you can’t distinguish, while shadow detail remains compressed. The overall result appears low-contrast and muddy.
RAW as Reference Data
Think of RAW files like film negatives. They’re not meant to look good directly. They preserve maximum information for processing. The “development” happens in your RAW converter—Lightroom, Camera Raw, Capture One—where you transform linear data into something that matches human vision.
This is why your camera’s JPEG preview looks better. The camera applied gamma encoding, contrast curves, saturation adjustments, and sharpening. The RAW file skips all of that and gives you the raw measurements.
Gamma Encoding: Redistributing Information to Match Your Vision
Gamma encoding solves the distribution problem. It’s a mathematical transformation that reallocates tonal values to match human perception.
The standard is gamma 2.2. The file gets encoded with a power curve using an exponent of approximately 0.45 (which is 1/2.2). Your display reverses this with its own 2.2 curve. The result looks natural to your eyes.
The Efficiency Gain and Why JPEGs Look Good
More levels go to shadows and midtones, where your eyes detect banding. Fewer levels go to highlights, where you can’t tell the difference anyway.
An 8-bit gamma-encoded JPEG has roughly the same smooth shadow detail as an 11-12 bit linear file. That’s why JPEGs look good at only 256 levels per channel. The encoding curve matches your perception, so you don’t see steps between values.
How the Math Works
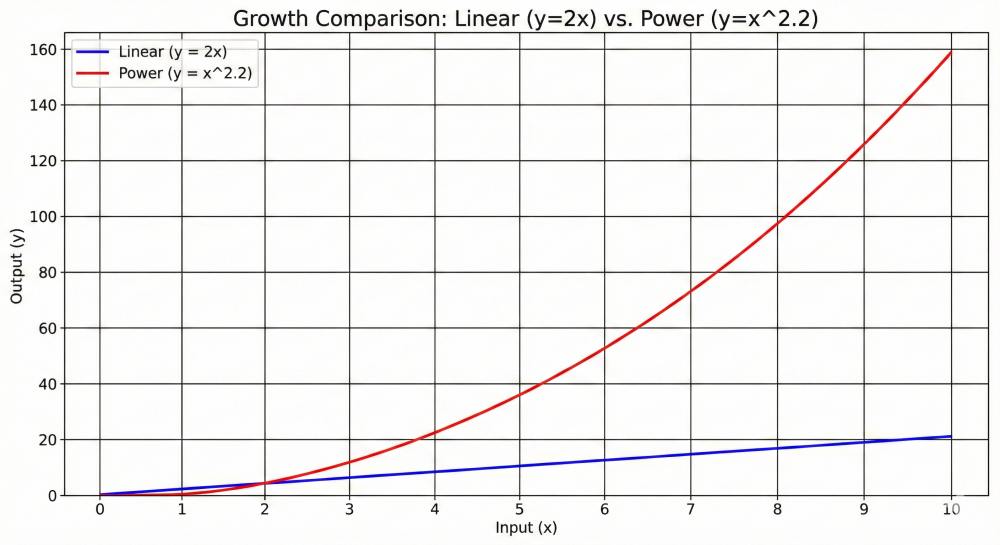
In a linear file, moving from value 10 to 20 represents the same physical light increase as moving from 100 to 110. But your eyes see the first change as massive and the second as tiny, because the first doubles, while the second is less than a 10% change.
Gamma encoding compresses the highlights and expands the shadows. After encoding, equal steps in file values produce equal perceived brightness steps. This matches what your eyes expect.
Why This Matters for Your Edits
This explains why you should never do heavy tonal adjustments on gamma-encoded files. When you push shadows in a JPEG, you’re stretching values that are already optimized for perception. The file doesn’t have extra headroom—those shadow levels were carefully distributed to avoid banding at normal viewing.
RAW files in linear space contain the actual photon counts. When you brighten shadows in Lightroom, you’re working with real light data that can be redistributed. The gamma encoding happens after your adjustments, so the final file still gets optimal bit distribution.
The CRT Legacy

The gamma 2.2 standard came from old cathode ray tube (CRT) televisions. The electron gun in a CRT naturally produced light following a power curve with an exponent of around 2.2. This was an electrical property of the phosphor coating used in the tubes.
Engineers realized this curve almost perfectly matched the inverse of human vision. They encoded video with gamma 0.45, let the CRT decode it with gamma 2.2, and got a natural-looking image. No additional processing needed.
Why We Still Use It
We haven’t used CRTs in decades, but we still use gamma 2.2 for several reasons.
Billions of images were created for this standard. Changing it would make everything look wrong. Modern LCDs and OLEDs are programmed to emulate the CRT response curve for compatibility. The math still works well for human perception, even though the original physical justification (phosphor glow curves) no longer applies.

Why Noise is Worse in Shadows
Light arrives as individual photons in a random pattern. This is called shot noise, and it’s fundamental physics you can’t eliminate.
The mathematical relationship is simple: Noise = √Signal
If a pixel receives 100 photons, the random variation is about 10 photons (√100 = 10). If it receives 10,000 photons, the variation is 100 photons (√10,000 = 100).
Signal-to-Noise Ratio
The ratio improves with more light. At 100 photons, you have 10% noise (signal/noise = 100/10 = 10:1). At 10,000 photons, you have 1% noise (10,000/100 = 100:1).
Bright areas look smooth because they received millions of photons. The random variation is invisible at this scale. Dark areas look grainy because they only received hundreds or thousands of photons. The random variation becomes visible as grain and color noise.
| Bit Depth | Linear Levels | Gamma-Encoded Shadow Equivalent | Perceptual Efficiency |
| 8-bit | 256 | ~11-bit linear in shadows | High for SDR |
| 10-bit | 1,024 | ~13-bit linear in shadows | Standard for HDR |
| 12-bit | 4,096 | ~15-bit linear in shadows | High-end Acquisition |
| 14-bit | 16,384 | ~17-bit linear in shadows | Professional RAW |
| 16-bit | 65,536 | ~19-bit linear in shadows | Archival/Scientific |
Why “Expose to the Right” Works

Capturing more light improves the fundamental physics of your image. If you underexpose and brighten in post, you’re amplifying the small signal that came from a few photons. You’re making the noise more visible.
If you expose brighter (without clipping), you capture more photons. The signal-to-noise ratio is better from the start. When you darken the image in post, you’re reducing a clean signal. This produces smoother results than brightening a noisy one.
Software can’t add information that the sensor never captured. Denoising algorithms can smooth grain, but they work better when you start with more photons. This is why “expose to the right” works—you’re optimizing the fundamental physics before any software touches the file.
Get Alerts When New Articles Are Published!
Editing in Lightroom vs. Photoshop: Different Math
Lightroom and Photoshop handle image data fundamentally differently. Understanding this explains why the same adjustment produces different results in each program.
Lightroom: Linear RAW Data
Lightroom’s Develop module works with linear sensor data—the actual light measurements. When you adjust exposure, the math is physically accurate. Doubling the exposure slider doubles the light values.
You have access to the full 12-14 stops of sensor dynamic range. Lightroom can recover blown highlights from color channels that haven’t clipped. If the red channel is blown but green and blue retain detail, highlight recovery can reconstruct luminance data.
All adjustments are non-destructive. Your changes are instructions stored in the catalog or XMP sidecar file. The original RAW file never changes. You can reset any parameter at any time without quality loss.
Practical implication: This is why you can push a RAW file’s shadows +3 stops in Lightroom and still get usable results. The linear data contains real photon counts from those dark areas. When you brighten them, you’re redistributing actual captured information, not stretching interpolated values.
The Following Makes Photoshop Seem a Poor Choice – But That Isn’t the Reality
The point of the article is to explain the difference between working in a RAW-based editor (Lightroom, PhotoLab, Dark Table, etc.) and Photoshop when working with pixel-based layers.
However, the truth of it is that you shouldn’t work on a pixel-based layer until the end of your edit. Most of the work uses Adjustment Layers, which are not pixel-based and are NOT destructive.
Photoshop: Gamma-Encoded Pixels
Photoshop works with rendered pixels in a gamma-encoded color space (sRGB, Adobe RGB, ProPhoto RGB). Once you convert a RAW file to a working space, it gets gamma-encoded.
The math is no longer physically accurate. Operations distort colors and tones in ways that don’t match real light behavior. You’re limited to roughly 8-10 stops of dynamic range. Highlights are already clipped—what’s gone is gone.
If you work only on the base file, these edits are destructive. You’re directly modifying pixel values. Repeated adjustments degrade quality through rounding errors and bit depth reduction.
However, using adjustment layers isn’t destructive. Only when you work on pixel-based layers.
Practical implication: If you push shadows +3 stops in Photoshop on a base layer using Curves or Levels, you’ll see banding, color shifts, and amplified noise. The file doesn’t have extra shadow detail—those values were already optimally distributed by the gamma curve. You’re just stretching the existing values and revealing the gaps between them.
This is the reason we use adjustment layers instead of pixel-based layers. Then the edits aren’t destructive.
The Math Problem with Gamma-Space Editing
When you try to double exposure in a gamma-encoded file, the math breaks.
You want: 2 × Light
You actually get: 2^2.2 × Light ≈ 4.6 × Light
The adjustment is more than twice as strong as intended. This explains several common problems in gamma-space editing.
Exposure adjustments in Photoshop feel harsh and quickly blow out highlights. Small slider movements create large changes because the math is wrong for the job. The same +1 stop move in Lightroom is smooth and predictable.
Colors shift when you adjust exposure in gamma space. Orange sunsets turn magenta. Skin tones go sallow. This happens because the power curve doesn’t preserve color relationships. The RGB channels get distorted at different rates.
When you blur or sharpen gamma-encoded images, dark halos appear around bright objects. This is edge contamination caused by doing spatial operations in the wrong space. The halos aren’t in the scene—they’re math artifacts. Lightroom’s sharpening and noise reduction work in linear space and avoid these problems.
What This Looks Like: Landscape Photography Example
You shot a sunrise landscape—graduated blue sky transitioning to orange near the horizon, dark foreground rocks. The RAW file in Lightroom looks good. You export as TIFF and open it in Photoshop to composite in a foreground element.
You need to brighten the midtones slightly where the composited element sits. You use Curves, pulling the midpoint up half a stop. The blue sky shifts toward cyan. The orange glow goes salmon-pink. The transition between them becomes harsh instead of gradual.
You try to sharpen the final composite. Dark halos appear around the bright sky edge where it meets the rock silhouettes. You didn’t oversharpen—the gamma curve caused the sharpening kernel to mix brightness values incorrectly.
The same workflow in Lightroom: use a radial gradient for the midtone brightening, apply sharpening in the Detail panel. No color shifts. No halos. The linear math preserves the color relationships and handles spatial operations correctly.
The Workflow Rule
Do tonal and color work in your RAW converter. Move to Photoshop for pixel-level work. This basic workflow preserves maximum image quality by using each tool where its math matches the task. A detailed workflow article covering advanced techniques will follow.
Lightroom Tasks
- Exposure adjustments – Linear math means doubling exposure doubles light values exactly
- White balance correction – Working with RAW sensor data before color space conversion
- Shadow and highlight recovery – Access to individual color channels before they’re merged
- Global color grading – HSL adjustments work on linear data without gamma-induced color shifts
- Tone curves – Building contrast in linear space before gamma encoding
- Lens corrections – Geometric and chromatic aberration fixes on unprocessed data
- Noise reduction and sharpening – Algorithms designed for linear sensor data
Photoshop Tasks
- Retouching and healing – Pixel-level cloning and content-aware fill
- Compositing and layer blending – Combining multiple images with masks
- Complex masking and selections – Precision selections for local adjustments
- Frequency separation – Texture and tone manipulation
- Liquify and transform tools – Geometric distortion and perspective correction
- Text and vector graphics – Adding non-photographic elements
Why This Division Matters
When you adjust exposure in Lightroom, +1 stop means exactly 2× the light. When you do the same in Photoshop on a gamma-encoded file, you get approximately 4.6× amplification (2^2.2). The result looks harsh and unnatural.
Lightroom’s highlight recovery can reconstruct detail from color channels that haven’t clipped. Once you render to Photoshop, that channel separation is gone. What’s clipped stays clipped.
Tone Curve vs Basic Panel: Understanding Your Lightroom Tools
Lightroom gives you two ways to adjust tones: the Basic panel (Exposure, Contrast, Highlights, Shadows, Whites, Blacks) and the Tone Curve. They work differently because they operate at different points in the processing pipeline.
Basic Panel: Working in Linear Space
The Basic panel sliders work directly on linear RAW data before gamma encoding. The Exposure slider doubles or halves actual light values. Highlights and Shadows sliders use range masks to target specific tonal areas, but the math remains linear.
This is why the Basic panel excels at recovering dynamic range. When you pull down Highlights, you’re working with the actual photon counts the sensor captured. The slider can redistribute values from individual color channels to prevent clipping.
Tone Curve: Working After Gamma Encoding
The Tone Curve operates after the initial gamma conversion. It adjusts the gamma-encoded values, not the linear sensor data. This gives you precise control over tonal relationships and contrast, but you’ve already lost access to the raw photon counts.
The curve is perfect for building contrast and creating specific tonal styles. You can steepen sections for more separation, flatten sections for compression. But it can’t recover the highlight detail that the Basic panel can save because it works downstream.
Which to Use When
Start with the Basic panel for all exposure and dynamic range work. Use Exposure to set overall brightness. Use Highlights and Shadows to recover extremes. Use Whites and Blacks to set your endpoints.
Then use the Tone Curve to refine tonal relationships. Build contrast in midtones. Adjust the shadow or highlight character. Create S-curves for classic film looks.
Never try to do basic exposure correction with the Tone Curve. You’re fighting the tool’s purpose. The Basic panel’s linear math handles that job correctly.
Conclusion
Your camera captures light as it physically exists—linear and objective. Your eyes perceive light on a curve—logarithmic and subjective. Gamma encoding bridges this gap by redistributing tonal information to match human vision.
This explains why RAW files look flat, why editing in Lightroom produces better tonal results than Photoshop, and why your camera applies picture profiles and contrast curves. It’s all physics—matching the objective measurement of light to the subjective experience of seeing.
Start your edits in Lightroom or Camera Raw for all tonal and color work. Use linear math to your advantage. Move to Photoshop only when you need pixel-level control for compositing, retouching, or precise selections. Understand where your data lives—linear or gamma-encoded—and choose the right tool for the math.
FAQ
Why do my RAW files look darker than the camera’s LCD preview?
Your camera applies gamma encoding, contrast curves, saturation boosts, and sharpening to create the JPEG preview. The RAW file contains unprocessed linear sensor data. It looks dark because most information sits in the highlights, where the linear encoding concentrates bit depth. This is normal and gives you maximum editing flexibility.
Can I recover blown highlights in Photoshop?
No. Once the RAW data is converted to JPEG or TIFF, clipped highlights lose recoverable information. Highlight recovery must happen in your RAW converter before rendering. Lightroom can sometimes recover detail from color channels that didn’t clip, but once the file is rendered, what’s gone is gone.
Why does increasing exposure in Photoshop look worse than in Lightroom?
Photoshop works in gamma-encoded space. When you increase exposure by 1 stop, the math applies 2^2.2 ≈ 4.6× amplification instead of the 2× you intended. This creates harsh, unnatural transitions and color shifts. Lightroom works with linear data, so doubling exposure doubles light values exactly as physics dictates.
Should I edit in 16-bit or 8-bit?
Use 16-bit for intermediate files if you’ll make multiple tonal adjustments. Each edit in gamma space introduces rounding errors. With 8-bit files, these errors accumulate and create visible banding. 16-bit provides enough extra precision to hide accumulated errors. For final export, 8-bit gamma-encoded JPEGs work fine because the gamma curve efficiently distributes the 256 levels.
What’s the difference between gamma 2.2 and 2.4?
Gamma 2.4 is used for video content and some Mac displays. It creates slightly darker midtones, which some people find more contrasty and cinematic. The difference is subtle. Both standards redistribute tonal information to match perception. Gamma 2.2 remains the standard for still photography and web content.
References
- Clark, R. N. “Digital Cameras: Counting Photons, Photometry, and Quantum Efficiency.” Clarkvision. https://clarkvision.com/articles/digital.photons.and.qe/
- Moria. “Image Sensors: Theory.” https://www.moria.de/tech/image-sensors/theory/
- Sony Community. “RAW Bit-Depth and Compression Options.” https://us.community.sony.com/s/question/0D50B00004YTYdsSAH/raw-bitdepth-and-compression-options
- Bellisario, C., et al. “Single-Photon Counting Detectors for Diffraction-Limited Light Sources.” Frontiers in Physics 12 (2024). https://www.frontiersin.org/journals/physics/articles/10.3389/fphy.2024.1304896/full
- Chakrabarti, S., et al. “Photon Counting Imaging with an Electron-Bombarded Pixel Image Sensor.” ResearchGate (2016). https://www.researchgate.net/publication/301715407_Photon_Counting_Imaging_with_an_Electron-Bombarded_Pixel_Image_Sensor
- Wikipedia Contributors. “Gamma Correction.” Wikipedia. https://en.wikipedia.org/wiki/Gamma_correction
- Huaxianjing. “How Are New Technologies Changing Gamma Correction in Modern LCD Systems?” https://huaxianjing.com/how-are-new-technologies-changing-gamma-correction-in-modern-lcd-systems/
- UWA. “Screen Post-Processing Effects: Gamma Space and Linear Space.” Medium. https://medium.com/@uwa4d/screen-post-processing-effects-gamma-space-and-linear-space-8be1af3be554
- Cambridge in Colour. “Clarification: Understanding Gamma Correction.” https://www.cambridgeincolour.com/forums/thread42414.htm
- Autodesk. “Colors and Gamma Correction.” Beast SDK Help. https://help.autodesk.com/cloudhelp/2015/ENU/Beast-SDK-Help/files/GUID-8CFC4CF7-F3AE-4092-81BE-C417DD0A4662.htm
- Cambridge in Colour. “Understanding Gamma Correction.” https://www.cambridgeincolour.com/tutorials/gamma-correction.htm
- Baeldung. “What Is Gamma Correction?” https://www.baeldung.com/cs/gamma-correction-brightness
- EDN. “Gamma Correction: What to Know, and Why It’s as Important as Ever.” https://www.edn.com/gamma-correction-what-to-know-and-why-its-as-important-as-ever/
- Scantips. “What and Why is Gamma Correction in Photo Images?” https://www.scantips.com/lights/gamma2.html
- Eizo. “What is LCD Monitor Gamma and How Do You Do Gamma Correction?” https://www.eizo.com/library/basics/lcd_display_gamma/
- Patsnap Eureka. “Benchmarking OLED Current Distribution Under High-Voltage Stress.” https://eureka.patsnap.com/report-benchmarking-oled-current-distribution-under-high-voltage-stress
- Wikipedia Contributors. “OLED.” Wikipedia. https://en.wikipedia.org/wiki/OLED
- DisplayModule. “OLED Screen Applications: Consumer Electronics, Automotive & VR.” https://www.displaymodule.com/fr/blogs/knowledge/oled-screen-applications-consumer-electronics-automotive-vr
- Awol Vision. “Guide to Gamma 2.2 vs. 2.4: Achieving Cinematic Fidelity in Your Home Theater.” https://awolvision.com/blogs/awol-vision-blog/gamma-2-2-vs-2-4
- Marsh, T. “How Lightroom, ACR, and Photoshop Work With Image Data.” Todd Marsh Photography. https://toddmarsh.com/how-lightroom-acr-and-photoshop-work-with-image-data/
- Adobe Community. “Achieving Same Effects with Camera RAW and Adjustment Layers.” https://community.adobe.com/t5/photoshop-ecosystem-discussions/achieving-same-effects-with-camera-raw-and-adjustment-layers/m-p/13958911
- Brooks, T., et al. “Image Unprocessing: A Pipeline to Recover Raw Data from sRGB Images.” IPOL Journal (2022). https://www.ipol.im/pub/art/2022/438/article_lr.pdf
- MathWorks. “lin2rgb – Apply Gamma Correction to Linear RGB Values.” MATLAB Documentation. https://www.mathworks.com/help/images/ref/lin2rgb.html
- Zhang, Y., et al. “Gamma Correction and Color Space Transformations for Quantitative Analysis of Electrochemiluminescence Images Using Smartphone Cameras.” PubMed Central (2024). https://pmc.ncbi.nlm.nih.gov/articles/PMC12648430/
- RawPedia. “Color Management.” RawTherapee Documentation. https://rawpedia.rawtherapee.com/Color_Management
- Reddit r/colorists. “A Comparison of the Best Ways to Achieve Photometrically Accurate White Balance on Log Footage in Resolve.” https://www.reddit.com/r/colorists/comments/1mm5zet/a_comparison_of_the_best_ways_to_achieve/
- Juckett, R. “RGB Color Space Conversion.” RyanJuckett.com. https://www.ryanjuckett.com/rgb-color-space-conversion/
- Moulin, M. “Linear, Gamma and sRGB Color Spaces.” https://matt77hias.github.io/blog/2018/07/01/linear-gamma-and-sRGB-color-spaces.html
- Adobe Community. “Editing in Adobe Camera RAW vs Photoshop.” https://community.adobe.com/t5/photoshop-ecosystem-discussions/editing-in-adobe-camera-raw-vs-photoshop/m-p/15335428
- Adobe Community. “Re: Editing in Adobe Camera RAW vs Photoshop.” https://community.adobe.com/t5/photoshop-ecosystem-discussions/editing-in-adobe-camera-raw-vs-photoshop/m-p/15335663
- Unity Technologies. “Linear or Gamma Workflow.” Unity Manual (2019.3). https://docs.unity3d.com/2019.3/Documentation/Manual/LinearRendering-LinearOrGammaWorkflow.html
- Learn OpenGL. “Gamma Correction.” https://learnopengl.com/Advanced-Lighting/Gamma-Correction
- Benz, G. “Which Colorspace Should You Use for Photography?” Greg Benz Photography. https://gregbenzphotography.com/photoshop/which-colorspace-should-you-use-for-photography/
- Prolost. “Color Correction in Linear vs. Gamma Corrected Space.” https://prolost.com/blog/2005/1/26/color-correction-in-linear-vs-gamma-corrected-space.html
- Unity Technologies. “Differences Between Linear and Gamma Color Space.” Unity Manual (6000.3). https://docs.unity3d.com/6000.3/Documentation/Manual/differences-linear-gamma-color-space.html
- Reddit r/Unity3D. “Why Alpha Blending is So Different in Unity and Photoshop?” https://www.reddit.com/r/Unity3D/comments/z2jtks/why_alpha_blending_is_so_different_in_unity_and/
