
Summary: A luminosity mask selects pixels based on their brightness—not as an on/off switch, but as a continuous percentage. What most editors miss: a Lights 1 mask selects every pixel in your image, including the deepest shadows. Understanding that single fact changes how you read and use every mask you will ever make.
Most Photoshop editors first encounter luminosity masks through a specific frustration. You try to darken an overexposed sky using a gradient or a rough selection, and the result is immediately wrong—a hard line above the ridgeline, halos around the treeline, it ends up looking like the sky belongs to a different photograph than the foreground beneath it.
Standard selection tools make a binary choice: each pixel is either fully inside the selection or completely outside it. That hard boundary is precisely what causes halos. Luminosity masks solve this by tying selection strength directly to pixel brightness, so every transition is inherently smooth—there is nothing to feather because the feathering is already built into the light in your image.
But here is the part that trips up even photographers who have been using luminosity masks for years: a Lights 1 mask does not ignore your dark pixels. It includes every pixel in the frame. The shadows at Zone III are selected. The midtones at Zone V are selected. The difference is how much each pixel is selected—and that single misconception, once corrected, changes the way you approach every masking decision.
I have included a pdf document that provides the percentages of each Tonal Zone that is included in all of the Lights & Darks masks. You can download the PDF below.
This article builds from the ground up—from why binary selections fail, through the Zone System framework that makes luminosity math readable, to the full mechanics of the Lights, Darks, and Midtones series. If you are already working with a plugin like TK9 to generate these masks automatically, understanding the mechanics underneath makes every decision you make with those tools more deliberate and more precise.
- Why Standard Selections Fail
- The Misconception: What Marching Ants Don't Tell You
- The Zone System as Your Tonal Map
- The Math Behind the Lights Series
- The Darks Series: Mirrored Math of the Lights
- The Math Behind Midtones Masks: Here is Where It Gets Fun!
- Choosing the Right Level: A Decision Framework
- Working with Luminosity Masks in Photoshop
- Generating Masks: Manual vs Plugin
- Conclusion
- FAQ
- References
Why Standard Selections Fail
The Magic Wand, Lasso tools, and AI-powered selections produce a selection that is 100% on or 100% off. When you darken through a selection like that, the adjustment runs at full strength inside the selection boundary and disappears completely outside it. At the edge, Photoshop interpolates between those two states across a handful of pixels—and the human eye is exceptionally good at detecting exactly where that interpolation happens.
In a landscape, light does not behave that way. The sky and the mountains are not separate objects with a clean seam between them. They share tones. Bright ridgelines reflect sky light. Atmospheric haze blends both into each other at the horizon. Any selection tool that treats the boundary as a line is imposing a structure the original scene never had—and the resulting adjustment will look exactly as artificial as the structure you imposed.
You can feather these selections but they are based on the distance from the selection edge rather than how light interacts with natural boundaries. Feathering can help in some circumstances but still it can look unnatural.
Luminosity masks replace the boundary with a gradient measured in the image’s own light values. The sky—being bright—is highly selected. The dark pines below it are barely selected. The ridge between them, where sky and tree blend together, is selected in proportion to its actual brightness. The result follows the physics of the scene rather than fighting against it.
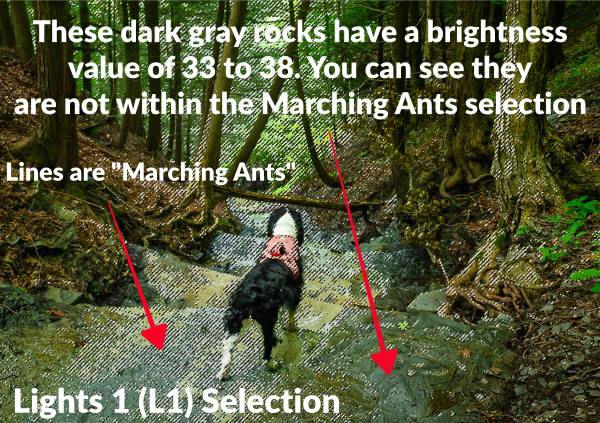
The Misconception: What Marching Ants Don’t Tell You
When you load a Lights 1 mask as a selection in Photoshop, the marching ants appear around the areas brighter than 50% gray. That visual indicator is where most editors form the wrong mental model—and where even experienced photographers go astray.
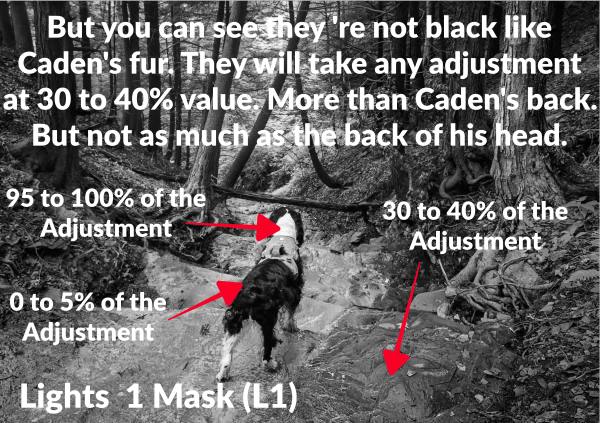
The marching ants boundary is not the selection boundary. Photoshop draws marching ants wherever selection strength exceeds 50%. Below that threshold, the selection is still active and still influencing any adjustment applied through it. A pixel at 30% brightness—deep in your shadow zone—is 30% selected. A pixel at 10% brightness is 10% selected. Only pure black at 0% is genuinely unselected in L1.
When I started working with luminosity masks, I assumed L1 selected everything above 50% gray and nothing below it. The name “Lights” reinforced that thought, and the logic seemed to hold: L2 would be a tighter selection of the lighter tones, L3 tighter still. The same model applied to the Darks series in reverse. It was a clean, intuitive framework—and completely wrong. Looking back, the mask itself would have told me: display any luminosity mask as a grayscale channel in Photoshop and you can see the gradual fade into the shadows. The evidence was visible the whole time but it failed to register in my brain.
“In a Lights 1 selection the marching ants show only where the selection exceeds 50% gray. Every darker pixel is still inside the selection—just at a fraction of its full strength.”
This matters enormously in practice. If you apply a -1.0 stop Curves or Brightness darkening adjustment through an L1 mask, the bright sky receives the full stop of darkening, as expected. What you may not expect is that your Zone III shadows—selected at 30%—are also receiving 30% of that adjustment: a 0.3-stop push into the deepest textured shadows. In a single subtle edit, you might not notice. Stack three or four adjustments through L1 masks, and the shadows will shift in ways that feel mysterious until you understand they were never excluded from the selection at all.
The Zone System as Your Tonal Map
To read luminosity mask selection tables fluently, you need consistent language for describing brightness values. The Zone System—originally developed by Ansel Adams for film photography and mapped to digital percentages—provides exactly that framework.
Adams divided every possible shade into 11 zones from pure black to pure white. In digital terms, these zones correspond to a 0–100% brightness scale in increments of ten. Zone V is middle gray at 50%. Zone VII is 70%, the approximate brightness of average light skin in open shade. Zone VIII sits at 80%, where textured whites—snow with surface modeling, a cotton shirt in direct light—still hold recoverable detail.
| Zone | Digital Value | Description |
| Zone 0 | 0% | Pure black; no detail |
| Zone I | 10% | Near black; slight tonality, no texture |
| Zone II | 20% | Textured black; first hint of shadow detail |
| Zone III | 30% | Average dark materials; shadows with full texture |
| Zone IV | 40% | Moderate shadow; dark stone, forest floor |
| Zone V | 50% | Middle gray; the neutral exposure reference |
| Zone VI | 60% | Average light skin tone; open sky shadows |
| Zone VII | 70% | Light skin; highest zone for strong surface detail |
| Zone VIII | 80% | Lightest textured tone; snow with surface modeling |
| Zone IX | 90% | Slight tone without texture; bright white surfaces |
| Zone X | 100% | Pure white; light sources, specular highlights |
Every value in the Lights and Darks tables below maps to one of these zones. When you read that an L3 mask selects Zone V at 12.5%, that means a middle gray pixel receives just 12.5% of whatever adjustment you apply through it—a controlled whisper rather than a full-strength hit. That precision is what separates luminosity masks from every cruder tool that preceded them.
The Math Behind the Lights Series
Lights 1 (L1) is a direct linear map of the image’s luminance values. For any pixel with a brightness value x expressed as a decimal between 0 and 1, the selection strength in L1 equals x exactly. A pixel at Zone VII (0.70) carries a selection value of 0.70. A pixel at Zone III (0.30) carries a selection value of 0.30. The relationship is linear and unmodified—a straight diagonal in Photoshop’s Curves space, passing through the origin (0,0) at pure black and reaching full selection (1,1) only at pure white.
To generate L2 through L6, the foundational mask is intersected with itself through successive multiplication. The formula governing each level is y = x^n, where x is pixel brightness expressed as a decimal and n is the mask level. L2 computes x², L3 computes x³, and so on through L6, which computes x⁶. Because every value between 0 and 1 satisfies x^n ≤ x for positive n, each successive intersection can only reduce selection strength—it never amplifies it. The practical result is that each additional level concentrates the selection progressively toward pure white, while the dark end of the histogram drops toward zero with increasing speed.
In Plain English: L1 maps brightness directly to selection strength. Each higher level multiplies that result by itself again, pushing the selection away from the midtones and shadows toward pure white. By L6, only pixels at Zone VIII and above retain meaningful selection strength.
The table below and the others in this article can be downloaded as a PDF for free.
Lights Table
A value of 100 is pure white and will receive 100% of any adjustment. A value of 0 is pure black and will receive no adjustment.
| Zone | L1 | L2 | L3 | L4 | L5 | L6 |
| Zone X (100%) | 100% | 100% | 100% | 100% | 100% | 100% |
| Zone IX (90%) | 90% | 81% | 72.9% | 65.6% | 59.0% | 53.1% |
| Zone VIII (80%) | 80% | 64% | 51.2% | 40.9% | 32.7% | 26.2% |
| Zone VII (70%) | 70% | 49% | 34.3% | 24.0% | 16.8% | 11.7% |
| Zone VI (60%) | 60% | 36% | 21.6% | 12.9% | 7.7% | 4.6% |
| Zone V (50%) | 50% | 25% | 12.5% | 6.2% | 3.1% | 1.5% |
| Zone IV (40%) | 40% | 16% | 6.4% | 2.5% | 1.0% | 0.4% |
| Zone III (30%) | 30% | 9% | 2.7% | 0.8% | 0.2% | 0.0% |
| Zone II (20%) | 20% | 4% | 0.8% | 0.1% | 0.0% | 0.0% |
| Zone I (10%) | 10% | 1% | 0.1% | 0.0% | 0.0% | 0.0% |
| Zone 0 (0%) | 0% | 0% | 0% | 0% | 0% | 0% |
Read the L6 column carefully. Zone V—middle gray—receives only 1.5% of any adjustment applied through L6. Zone III is effectively zero. This is what “surgical precision” actually means in quantitative terms: an adjustment strong enough to recover a nearly blown highlight will barely register in the midtones and leave the shadows untouched.
The Darks Series: Mirrored Math of the Lights
The Darks series begins with D1, the mathematical complement of L1. Where L1 assigns a selection value of x to any pixel with brightness x, D1 assigns (1 − x). A pure white pixel (x = 1.0) receives a D1 selection of 0. A pure black pixel (x = 0) receives a D1 selection of 1.0. Middle gray at Zone V receives exactly 50% selection in both series simultaneously—a symmetry with direct implications for how midtones masks are constructed. Successive Darks levels follow the same intersection logic as the Lights series applied to the complement value: D2 computes (1 − x)², D3 computes (1 − x)³, through D6 at (1 − x)⁶. The practical effect is a mirror image of the Lights progression—where L6 concentrates selection at pure white, D6 concentrates selection at pure black.
In Plain English: D1 is L1 flipped—dark pixels are now fully selected, bright pixels are released. Each higher level concentrates the selection further into the pure shadows, leaving midtones and highlights progressively untouched.
Darks Table
The table is flipped. When you use a Darks luminosity mask the darker tones are affected more. This is where it can become confusing because in the luminosity mask the dark tones are white while the lighter colors are a darker gray or black.
| Zone | D1 | D2 | D3 | D4 | D5 | D6 |
| Zone 0 (0%) | 100% | 100% | 100% | 100% | 100% | 100% |
| Zone I (10%) | 90% | 81% | 72.9% | 65.6% | 59.0% | 53.1% |
| Zone II (20%) | 80% | 64% | 51.2% | 40.9% | 32.7% | 26.2% |
| Zone III (30%) | 70% | 49% | 34.3% | 24.0% | 16.8% | 11.7% |
| Zone IV (40%) | 60% | 36% | 21.6% | 12.9% | 7.7% | 4.6% |
| Zone V (50%) | 50% | 25% | 12.5% | 6.2% | 3.1% | 1.5% |
| Zone VI (60%) | 40% | 16% | 6.4% | 2.5% | 1.0% | 0.4% |
| Zone VII (70%) | 30% | 9% | 2.7% | 0.8% | 0.2% | 0.0% |
| Zone VIII (80%) | 20% | 4% | 0.8% | 0.1% | 0.0% | 0.0% |
| Zone IX (90%) | 10% | 1% | 0.1% | 0.0% | 0.0% | 0.0% |
| Zone X (100%) | 0% | 0% | 0% | 0% | 0% | 0% |
A Zone II shadow pixel (x = 0.20) retains a D6 selection of (0.80)⁶ = 26.2%—enough to carry meaningful adjustment strength into the deepest textured shadows without disturbing the lighter tones at all. Compare this to L6, where Zone II receives 0.0% selection. These two masks at their sixth levels are polar opposites, and combining them is where advanced dodging and burning becomes possible.
The Math Behind Midtones Masks: Here is Where It Gets Fun!
TK9 builds its midtones masks in two stages. The foundation is a subtraction formula applied to the full image channel:
Base mask = max(0, All − Lights − Darks)
Because L1 and D1 are mathematical complements — they sum to exactly 1.0 at every pixel — this base formula produces 50% selection at Zone V and zero selection at pure black and pure white. That base mask is TK9’s M2, and its values follow directly from the formula.
Midtone Luminosity Masks protect the highlights and the darks. Making an adjustment with a Midtone’s Mask will not affect either end of the histogram.
From there, TK9 applies a Levels adjustment in both directions to generate M1 and M3. Compressing the output produces M1 — a narrower, more restrictive selection targeting only the truest midtones. Expanding it produces M3 — a broader selection that reaches well into the lighter and darker zones on either side of center while remaining anchored at zero for pure black and pure white.
The Midtone Luminosity Masks created by the TK 9 Photoshop Plugin protect the highlights and darks even more than standard Midtone Masks.
Rather than rely on documentation alone, I verified all three masks directly. I applied each TK9 midtone mask to a black-to-white gradient layer in Photoshop and read the Info panel value at each zone using a step sampler. Every value in the table below is a confirmed measurement, not a formula estimate.
In Plain English: TK9 gives you three distinct midtones tools. M1 targets only the true midtones with a low ceiling — precise and controlled. M2 is the mathematically pure version, the textbook midtones bell curve. M3 spreads across most of the tonal range, protecting only the absolute extremes. Higher numbers mean wider, lighter masks — the direct opposite of how the Lights and Darks series behave.
| Zone | TK9 M1 | TK9 M2 | TK9 M3 |
| Zone X (100%) | 0% | 0% | 0% |
| Zone IX (90%) | 6% | 18% | 15% |
| Zone VIII (80%) | 13% | 32% | 44% |
| Zone VII (70%) | 19% | 42% | 70% |
| Zone VI (60%) | 23% | 48% | 82% |
| Zone V (50%) | 24% | 50% | 84% |
| Zone IV (40%) | 23% | 48% | 82% |
| Zone III (30%) | 19% | 42% | 70% |
| Zone II (20%) | 13% | 32% | 44% |
| Zone I (10%) | 6% | 18% | 15% |
| Zone 0 (0%) | 0% | 0% | 0% |
All values confirmed by direct measurement in Photoshop using TK9’s masks applied to a black-to-white gradient layer, sampled with the Info panel set to Grayscale. M2 values also match the subtraction formula output exactly.
The symmetry in all three masks is exact — Zone IV and Zone VI read identically, Zone III and Zone VII read identically, and so on. That symmetry is a direct consequence of the bell curve structure and confirms the measurements are clean.
What the numbers mean in practice:
TK9’s M3 reaches Zone VII at 70% and Zone VIII at 44%. That means bright foliage, light skin, and upper-midtone rock textures are receiving a substantial portion of any adjustment you apply through M3. This is not a midtones isolation tool — it is a broad tonal adjustment that happens to protect pure black and pure white. Use it for global contrast lifts or warming moves across the full tonal range.
TK9’s M1 peaks at 24% at Zone V. Even at its strongest point, it delivers less than a quarter of any adjustment. That low ceiling is not a weakness — it means you can push the adjustment further without risk of over-processing the midtones, and the result stays controlled. It is the right tool when you need to add contrast or warmth specifically to subjects sitting in the true middle of the tonal range.
A note on other plugins and manual methods: Construction methods vary across tools. Some manual masking scripts and third-party plugins use a Multiply intersection approach instead of subtraction, computing the midtones mask as L × D. This produces the opposite progression — narrower masks at higher levels. If a mask set you are using behaves unexpectedly, run the same test used here: apply the mask to a gradient layer and read the Info panel value at Zone V. That single reading tells you which formula your tool is using and whether higher numbers are wider or narrower.
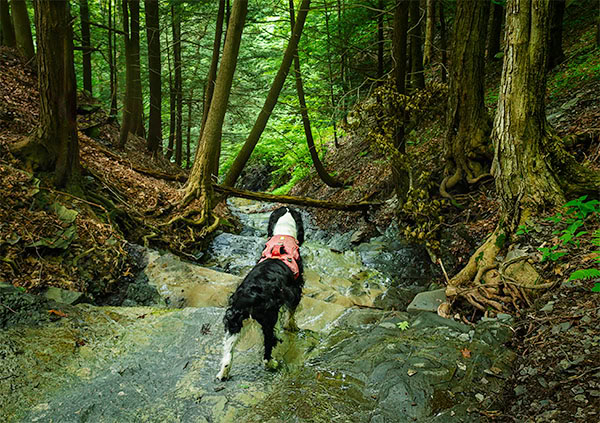
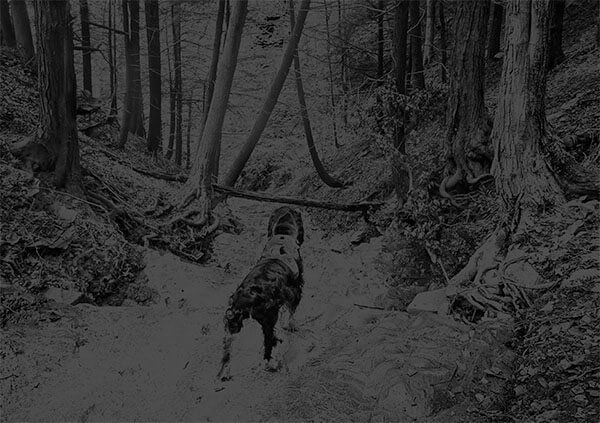
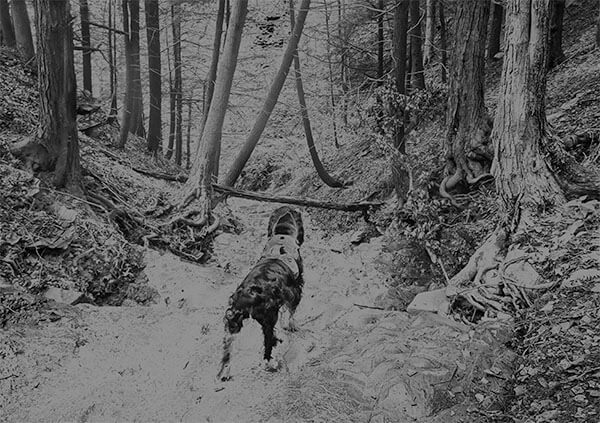
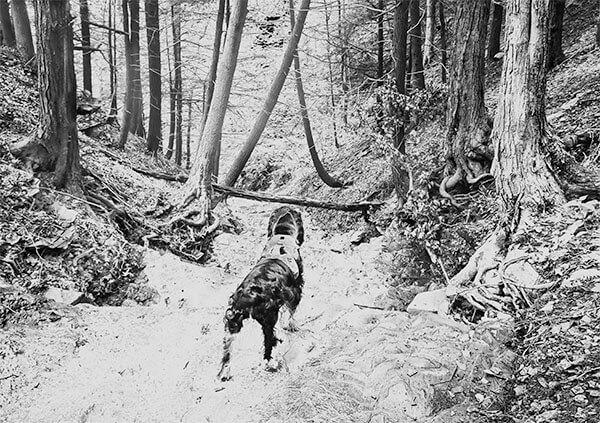
In the series of images above, you can see Caden standing on the top ledge of a waterfall looking over the valley below. The next three iamges are the same image with TK-9 Midtone Masks Applied to the first image. Notice his black back and white neck cape. As with all Luminosity Masks, white reveals and black conceals.
Notice that none of the Midtone Masks affect the white neck cape or the majority of his black back, only light that reflects off his shiny black fur on his back. This is the advantage of Midtone Masks, there is no worry of crushing your blacks or blowing out your highlights.
Get an email when new articles are published
Choosing the Right Level: A Decision Framework
Selecting a mask level is not about memorizing a rule. It is about locating your subject in the Zone System, reading the table, and choosing the level where the selection percentage at that zone matches what you want the adjustment to do. The tables give you numbers. This section tells you what to do with them.
Lights Masks: Working From the Bright End
For broad sky darkening with moderate shadow protection use an L2 or L3 mask. At L2, Zone VI — open shadow, lighter foliage, atmospheric haze — receives 36% of any adjustment. At L3 that drops to 21.6%. If your foreground contains bright water, foliage, or rock faces that sit in Zone VI or above, L3 is the safer starting point. You can always paint the mask to protect specific areas, but starting at L2 with a busy foreground will push more adjustment into it than most edits can absorb cleanly.
For isolated highlight recovery: L4 through L6. By L4, Zone VI is down to 12.9% and Zone V is under 7%. You can push a recovery curve hard through L4 without the midtones responding meaningfully. Use L5 or L6 only when you are targeting a small specular hotspot or a narrow patch of blown sky — the selection is so restricted that it takes a strong adjustment to register at all, and the risk of over-processing the target zone rises accordingly. L6 at Zone IX is still only 53.1%, so even the brightest non-specular tones are receiving just over half the adjustment at the strongest level.
The stacking problem with L1. L1 is the most tempting mask to reach for because it feels like a complete selection of the bright areas. It is not. Zone III receives 30% of every adjustment applied through L1. Two modest L1 darkening layers at −0.5 stop each deliver a combined 0.3-stop push into your deepest textured shadows — invisible on screen in a single edit, potentially visible in print across several. Use L2 or L3 for broad tonal coverage. Reserve L1 for situations where you specifically want the shadow influence it carries, and know that you are choosing it deliberately.
Darks Masks: Working From the Shadow End
For lifting shadow detail without affecting midtones: D2 or D3. D1 reaches Zone VI at 40% — strong enough to visibly brighten lighter foreground tones if the adjustment has any real strength behind it. D3 drops Zone VI to 6.4% and reduces Zone VII to 2.7%. That is the level at which you can lift a dark rock face, open up shadow under forest canopy, or recover blocked-up bark texture without your midtone subject brightening alongside it.
SideBar: Dark Masks in Action
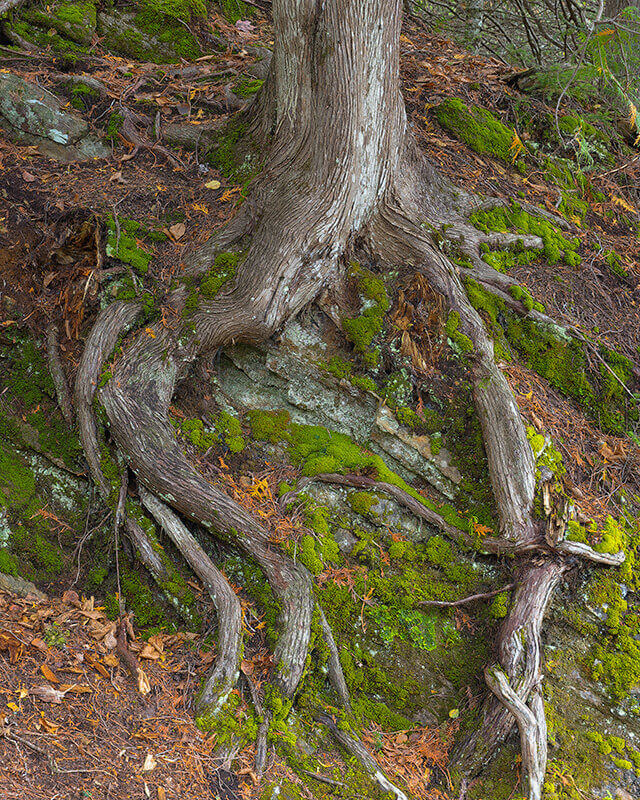
The image above is for an upcoming book — Rocks & Roots, a project documenting trees that are growing across exposed rock faces — I put a D3 mask on the image test that idea mentioned above. The image needed more contrast in the lower tonal zones: the dark areas where root meets rock, where lichen patches absorb light differently than bare stone. For the purpose of increasing the contrast so dodging & burning would have a greater effect creating more depth and dimension in the tree and rock face.
I used a D3 mask through a Brightness/Contrast adjustment layer let me push negative brightness into those dark zones without touching Zone VII or above. The Base Tone Method had preserved headroom in the darkest areas coming out of Lightroom, so the darkening had room to move without crushing the shadows to black.
With the lower midtones already separated from the highlights, the subsequent dodge and burn layers could work on depth and surface texture — the lichen, the grain of the cedar bark, the transition where root lifts away from stone — without fighting a flat tonal base underneath them.
For aggressive shadow lifting that still protects the highlights: D1. D1 at Zone VI is 40% and at Zone VII is 30%. If your subject is genuinely dark and needs significant lifting, D1 gives you reach into the lower midtones that D2 and D3 do not. Understand that Zone VI will move — account for that in the adjustment strength or paint the mask to protect specific areas after the fact.
For deep shadow work only: D4 through D6. By D4, Zone IV is down to 12.9% and Zone V is at 6.2%. These are surgical tools for the deepest shadow zones — pure blacks, near-black textures, the very bottom of the histogram. If you are trying to open up crushed shadow detail without touching anything above Zone III, D5 or D6 is where to start.
Midtones Masks: The TK9 System
The TK9 Plugin provides three midtones masks — M1, M2, and M3. Rather than relying on documentation alone, I verified all three directly by applying each mask to a black-to-white gradient layer in Photoshop and reading the Info panel at each zone. Every value below is a confirmed measurement.
The progression runs narrower to wider: M1 is the most restrictive, M3 the most inclusive. This is the opposite of the Lights and Darks series, where higher numbers mean tighter selections.
For precision midtone targeting: TK9 M1. M1 peaks at 24% at Zone V — less than a quarter of any adjustment at its strongest point. That low ceiling is not a limitation; it is the feature. You can push the adjustment strength further without risk of over-processing, and the result stays controlled because the mask itself is absorbing most of the force. Use M1 when you need to add contrast, warmth, or local pop specifically to subjects sitting in Zones IV through VI — midground elements in a landscape, subjects in open shade, foliage at middle brightness — without the edit registering in the highlights or the deep shadows.
For the textbook midtones response: TK9 M2. Zone V at 50%, tapering symmetrically to zero at pure black and pure white. M2 is the subtraction formula without modification — the mask most luminosity masking tutorials are describing when they say “apply a midtones mask.” It is the right tool when you want a balanced midtone response and your subject sits clearly in the middle of the tonal range without significant overlap into the highlights or shadows.
For broad tonal adjustments that protect only the extremes: TK9 M3. Zone V at 84%, Zone VII at 70%, Zone VIII at 44%. Read those numbers carefully. M3 is delivering 44% of any adjustment to Zone VIII — textured snow, bright white fabric, the lightest tones still holding surface detail. This is not a midtones isolation tool. It is a broad tonal mask that affects nearly the full histogram while protecting only pure black and pure white. Use it for gentle global contrast lifts, subtle overall warming, or any adjustment where you want the full tonal range to participate except the absolute extremes.
A Note on Other Plugins and Manual Methods
The values shown in the Midtones Table above are specific to TK9. Other plugins and manual masking scripts use different construction methods and will produce different selection strengths at each zone. Some use a Multiply intersection approach — computing the midtones mask as Lights × Darks — which produces the opposite progression: narrower masks at higher levels, with Zone V starting at 25% and falling from there.
If a mask set you are using behaves unexpectedly, run the same test used here: apply the mask to a black-to-white gradient layer and read the Info panel at Zone V. That single reading tells you whether higher numbers in your tool mean wider or narrower, and where the peak selection sits. Do not assume the labeling convention matches TK9’s.
Reading the Tables Together
The three series are designed to cover the full histogram without gaps:
- Lights masks work from the bright end inward. Higher levels release the shadows progressively.
- Darks masks work from the shadow end inward. Higher levels release the highlights progressively.
- Midtones masks work from the center outward. Higher levels expand coverage toward the extremes.
In most edits, a single mask from one series is sufficient. When your subject shares tones with the background — a light-toned rock face against a bright sky, a dark subject against a shadowed forest — no single mask will separate them cleanly. That is when you combine: start with the mask that covers your subject’s zone, paint out the areas where it is selecting the background, or use TK9’s Calculator to intersect masks from different series. The tables tell you what each mask is doing. The painting and intersection work is how you handle what the math cannot resolve on its own.
Don’t forget to download your Free Luminosity Mask Quick Reference Guide!
Working with Luminosity Masks in Photoshop
Luminosity masks are always applied through an adjustment layer. You load the mask as a selection—either from the Channels panel or a plugin interface—add your adjustment layer, and Photoshop uses the active selection as that layer’s mask. The adjustment layer is non-destructive: you can revisit the mask, paint into it, invert it, or replace it entirely without altering the pixel data underneath it. For a grounding in how adjustment layers and pixel layers interact in a stable editing stack, the non-destructive editing in Photoshop post covers the principles that apply directly here.
Before I understood how selection strength mapped to the Zone System, I used luminosity masks almost exclusively as stencils for dodging and burning—load the mask, paint through it, and let it prevent the brush from running into areas where it did not belong. That is a legitimate use, and it works. But it left most of the tool’s precision on the table. Once I understood which zones each level was actually reaching, I started using luminosity masks for global tonal adjustments that previously felt too risky to attempt—sky recoveries applied through L4 that simply did not touch the foreground, shadow lifts through D3 that left the subject tones alone. The difference was not guess work; it was knowing what the numbers meant before reaching for the brush.
One practical habit the math supports: do not apply the same mask level across multiple stacked adjustments without checking what accumulates in the shadows. Each layer that uses L1 is delivering 30% of its adjustment to Zone III. Two modest L1 layers at -0.5 stop each feel controlled individually. In the shadows, that adds up to a 0.3-stop combined push that may shift your darkest tones in ways that are visible in print even when they looked fine on screen. Use L2 or L3 for broad tonal coverage and reserve L1 for situations where you specifically want the shadow influence it carries.
When dodging and burning through luminosity masks, mask selection percentage combines with layer opacity and brush flow into a three-way control system. The difference between opacity and flow in Photoshop is worth working through before combining those variables with mask selection strength—the interactions are not always intuitive, and misunderstanding flow in particular causes streaking problems that are hard to diagnose once they are incorporated into a stack of layers.
Luminosity masks are Photoshop territory. Lightroom Luminosity Masks do not work as well as they do in Photoshop. I will publish an article describing the differences and link it here.
If you are still primarily working in Lightroom and weighing when the move to Photoshop is worth the investment, Lightroom vs Photoshop for landscape photography covers that transition in practical terms—including which adjustments are better done before you ever open Photoshop and which require pixel-level access that Lightroom cannot provide.
Generating Masks: Manual vs Plugin
You can create luminosity masks entirely by hand in Photoshop’s Channels panel. For the Lights series, the process involves loading the composite luminance channel as a selection (Ctrl/Cmd + click the RGB thumbnail), saving it as an alpha channel for L1, then using Apply Image with Multiply blending to intersect the channel with itself for each successive level—L2 through L6. The Darks series follows the same logic on the inverted channel. Midtones masks require a separate approach: you create a full white channel and use Apply Image in Subtract mode to remove L_n and D_n sequentially, producing the max(0, 1 − x^n − (1−x)^n) result described above. The method works, but generating a complete set manually runs 20 to 30 minutes for someone who has memorized the steps.
You can create Photoshop actions for the processes above, but they are still not as handy or useful as using a plugin.
Plugins automate this entirely and add capabilities that the manual method cannot easily produce. TK9 by Tony Kuyper generates a full mask set in seconds and includes combination masks—Lights intersected with a specific color range, for example, to select only the orange-lit highlights in a sunset without including equally bright portions of a blue sky. The Calculator panel takes this further, combining masks through Boolean logic that would require careful channel arithmetic to replicate by hand.
The argument for learning the manual method first is not about whether you will use it in production—most photographers who understand luminosity masks well use a plugin. The argument is that when an automated mask produces a result you did not expect, the photographer who understands the underlying math can read what happened. The one who only knows which button to press is stuck.
“Learn the manual method not for speed, but for comprehension. When a plugin mask behaves unexpectedly, understanding the math is how you diagnose it.”
Conclusion
Luminosity masks are not a Photoshop feature so much as a principle: selections derived from the image’s own light data will always blend more naturally than selections imposed from outside. Whether you use L1’s linear map or L6’s surgical restriction, the math formalizes how light already exists in your photograph.
The single correction that makes the biggest difference for most editors is the one this article opened with: every pixel is already selected. L1 does not protect your shadows—it reduces the adjustment reaching them. L6 reduces it further. If shadow protection is what you need, you are looking for a Darks mask, not a high-level Lights mask, potentially combined with painted refinement where the tonal overlap between subject and background does not permit a clean automatic separation.
For better tone protection we will need to learn Photoshop’s Blend-If. Article coming soon!
That distinction, once internalized, changes not only how you read the tables but how you build every masking decision from the ground up. It changed mine. The masks I reached for out of habit before learning the math were not wrong—they were just approximate. Knowing that L4 holds Zone VI to 12.9% and that D3 reduces Zone VII to 2.7% turns mask selection from an educated guess into a decision with a specific rationale. The images do not look dramatically different from the outside. The process of making them does.
FAQ
What is a luminosity mask in Photoshop? A selection based on pixel brightness. Bright pixels are highly selected; dark pixels are minimally selected. The transition is continuous, not binary, which makes tonal adjustments blend naturally with the existing light in the image.
Does a Lights 1 mask only select the bright areas? No. L1 selects every pixel in the image. A pixel at 30% brightness is 30% selected. Marching ants appear only where selection exceeds 50%, which misleads most editors about the mask’s actual reach into the shadows.
How do I choose between Lights levels? Locate your subject’s zone in the Lights selection table. If Zone VI receives more adjustment than you want at L2 (36%), move to L3 (21.6%) or L4 (12.9%) until the percentage at that zone matches the strength your edit requires.
What are midtones masks used for? Adding contrast, warmth, or lift to the middle tonal range—subjects, foliage, and open shadows in Zones IV through VII—without brightening highlights or deepening shadows beyond what that range naturally holds.
Do I need a plugin to use luminosity masks? No. You can create them manually in Photoshop’s Channels panel using Apply Image with Multiply blending. Plugins like TK9 automate the process and add combination tools, but the underlying math is the same regardless of how you generate the mask.
References
- Kuyper, T. (2006). Luminosity Masks Tutorial. Tony Kuyper Photography. https://goodlight.us/writing/luminositymasks/luminositymasks-1.html
- Kuyper, T. (2024). TK9 Multi-Mask Module Documentation. Tony Kuyper Photography. https://goodlight.us/tk-actions/ [Manufacturer source — confirms subtraction method for midtones series and progressive expansion of higher levels. No independent corroboration of specific implementation details available as of publication.]
- Varis, L. (2015). The Digital Zone System. Rocky Nook. [Authoritative mapping of Adams’ zones to digital sRGB/LAB values.]
- Bagshaw, S. (2017). The Advantages of Luminosity Masks. Capture Landscapes. https://capturelandscapes.com [Tier 2 — independent third-party workflow documentation.]
- McIntyre, J. (2020). A Photographer’s Guide to Luminosity Masks. Rocky Nook. [Manual creation and plugin automation.]
- Benz, G. (2022). Lumenzia Tutorial: Advanced Masking Strategies. https://lumenzia.com [Manufacturer source — independent corroboration: see Bagshaw (2017).]
- Adams, A., & Archer, F. (1940). The Negative. New York Graphic Society. [Primary source — Zone System foundation.]
- Affinity Photo / darktable Community. (2015–2024). Luminosity Masking Calculations. Forum and documentation. [Tier 5 — community-sourced mathematical documentation; corroborated by Kuyper (2006) and Varis (2015).]