
When editing photos, the first step matters most. How your RAW files are processed for noise, color, and detail can change everything.
Many nature photographers begin with Adobe Lightroom or Camera Raw using the built-in camera profiles.
But there’s a better way. DxO PureRAW processes RAW files differently—and I would say, better. Especially if, like me, you have an older camera and lens setup.
This post breaks down what makes DxO PureRAW stand out. We’ll compare it to Adobe’s RAW workflow.
We’ll also discuss how DxO PureRaw addresses soft focus spots in your images.
You will see the file improvements, especially when considering the soft focus spots.
Before we get going, I want you to know that I’m not sponsored or affiliated with either Adobe or DxO in any way. I have bought both products and use both products almost every day. I like both and use both in my editing workflow.
Newly Added!
I have created a video showing how I use DxO PureRAW; it is in the Learning Center. You can click here to be taken to the video or to sign up for FREE to see all of the videos in the Learning Center!
Here is the File We Will Work On
The image of this mushroom cluster was taken on September 11, 2024, at Pleasant Valley Nature Preserve.
I used an old Fujifilm X-S10 released in 2020 with the Fujifilm XF16-80 F4 R OIS WR kit lens. The image was taken at 58.6mm at F/5.6, ISO 3200, and at 1/80 second. The lens is sharpest at f/7.1, but I needed a little more speed for the hand-held shot.
Here is the RAW file exported in JPEG. All images were exported using Lightroom Classic export module at a quality of 60 and 1000 pixels on the long edge in the Adobe RGB color space.
The low quality and small size are for better performance on the website. As I write this, I haven’t even looked at the photos on the website, only at the computer’s image preview.
Here is the RAW File with nothing done to it except that it is using a Linear Profile developed by Tony Kuyper. This is why it is quite dark. I might also include brightened-up images if they show the amount of noise reduction better. I guess I’ll know when I finish the article.

How DxO PureRAW Handles Lens Corrections vs. Adobe Lightroom
Before we compare the images, let’s talk about how each of these software programs handles lens corrections and noise reduction.
Both Lightroom and DxO PureRAW offer lens correction tools. But how they work, and where they get their data, differs a lot.
Adobe Lightroom relies on lens profiles from camera and lens makers or third-party sources. These profiles are mostly based on manufacturer specs and general lab tests. Many are made in-house by Adobe. You can choose to turn on corrections manually or apply them automatically if your lens is recognized.
Lightroom corrections fix:
- Distortion
- Vignetting
- Chromatic aberration
These fixes are applied using mathematical models based on lens design. But not all lens models are equal. Some profiles are better than others. Third-party lenses or older models may have less accurate data. Also, Lightroom doesn’t always correct field softness or edge detail loss.
DxO PureRAW takes a different path.
DxO builds custom optical modules in its own lab. These modules are made for specific camera + lens combinations. That’s key. It means DxO knows exactly how your lens behaves on your camera, not just in theory. They shoot thousands of test images to measure:
- Distortion
- Vignetting
- Chromatic aberration
- Sharpness drop-off
- Color shifts at edges
- Local softness
Then they use this data to build precision correction models. The results are often more accurate than Lightroom’s.
The corrections based on using a camera/lens combination are the key. It would make sense that lens quality would not be the same when using different camera bodies.
Save 15%
Use Coupon Code
MARSH
to save 15% on any DxO software for new customers!
Visit DxO
Another Key Point
DxO’s modules dig deeper. For example, if your 24-70mm lens loses sharpness at 70mm in the corners, DxO will fix it using data taken at that exact focal length. Adobe might correct some distortion, but won’t restore sharpness or contrast in those same spots.
DxO PureRaw uses data from DxOMark and creates a model based on each lens on each camera at all lens focal lengths and apertures.
That’s why DxO often makes lenses look better—especially budget zooms or compact primes that have more flaws.
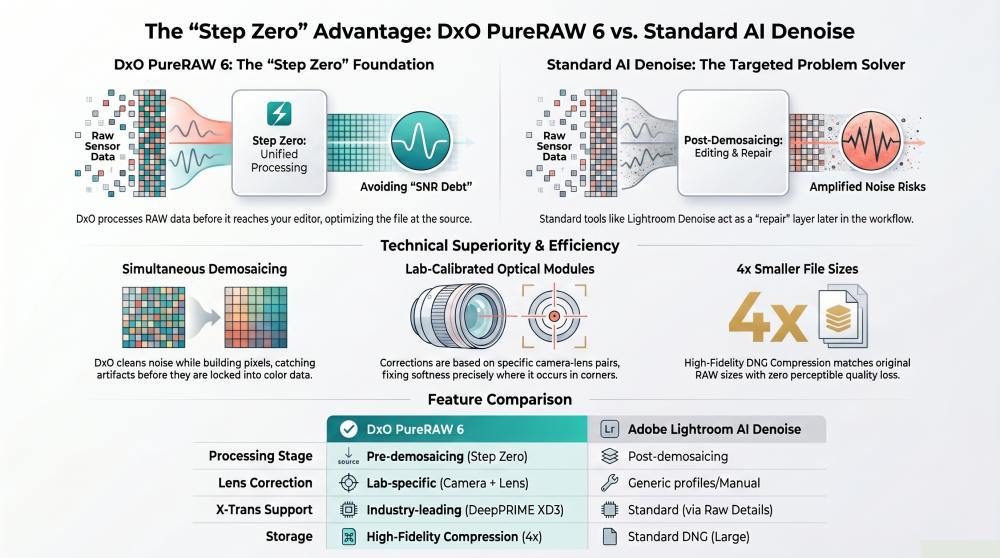
Adobe Denoise vs. DxO PureRAW Noise Reduction: What’s the Difference?
Both Adobe and DxO offer AI-powered noise reduction. Both can improve high ISO images. But they take different paths and give different results.
Adobe Denoise (Lightroom and Camera Raw)
Adobe’s “Denoise” is based on machine learning. It uses AI to reduce noise while keeping detail. It works well on high ISO RAW files. But it’s slow—it takes several seconds per file and creates a new DNG copy.
What it does:
- Reduces color and luminance noise
- Tries to preserve texture and edges
- Works best on RAW files with visible noise
You control the strength of the effect using a single “Denoise” slider. It’s easy to use, but less flexible than other tools. Detail and sharpness can still look a little “mushy” in some areas. On top of that, it doesn’t correct lens softness or other image flaws.
Get an email when new articles are published
DxO PureRAW (DeepPRIME and DeepPRIME XD2s/XD)
DxO uses two noise reduction methods: DeepPRIME and DeepPRIME XD2s/XD in DxO PureRaw 4 (which I used). DxO also has a new DxO PureRaw 5, but I did not purchase the upgrade. It claims to be even better than version 4. Here is the difference between the 2 methods.
- DeepPRIME is faster and works great for general use.
- DeepPRIME XD2s/XD is slower but gives better results in tough lighting or at very high ISO. This is the process I used on the photo included later in the article.
Both tools are trained on millions of images from real-world cameras and lenses. DxO’s noise reduction is built into the full RAW processing pipeline. That means it’s happening at the same time as demosaicing (the process of turning sensor data into a photo). This gives it an edge with noise reduction and detail recovery because they happen together, not in separate steps.
What makes it better:
- Maintains fine detail in shadows and edges
- Balances sharpness and smoothness more naturally
- Works well even on very noisy files (ISO 6400+)
- Reduces color blotching and grain without plastic-looking results
You don’t get as many manual controls. But you also don’t need them. DeepPRIME does its job automatically and reliably.
Quick Comparison
| Feature | Adobe Denoise | DxO PureRAW (DeepPRIME XD2s/ XD) |
| Speed | Slower per file | Fast (DeepPRIME), Slower (XD) |
| Detail preservation | Good | Excellent |
| User control | One slider | Preset selection (Auto) |
| Lens softness correction | No | Yes |
| Based on AI? | Yes | Yes |
| Applies during demosaic? | No | Yes |
| Output format | DNG | DNG or JPEG |
Adobe’s Denoise works well and continues to improve. But DxO often keeps finer details while removing more noise, especially in the darkest parts of the image.
What Does DxO PureRAW Do Differently?
DxO PureRAW doesn’t use only lens profiles like Adobe does. Instead, it works behind the scenes to fix what your lens and sensor got wrong. It corrects lens flaws, sharpens soft spots, removes noise, and keeps fine detail. All before you even open the file in Lightroom.
Here’s what DxO PureRAW fixes in the RAW file:
- Noise – PureRAW uses AI tools trained on millions of photos. They clean up high ISO shots better than Adobe’s tools.
- Lens defects – PureRAW uses optical modules made from lab tests. Each module is tailored to a specific camera-lens pair.
- Soft focus – PureRAW pulls detail back from fuzzy spots. Even edges and corners look sharp after it’s done.
- Distortion, vignetting, chromatic aberration – These are corrected automatically based on the lens profile.
How DxO Handles Soft Focus and Edge Blur
Every lens has weak spots. Corners may blur. Edges may lack contrast. That’s a problem in landscapes and wildlife shots where every pixel matters. DxO PureRAW applies sharpening and deblurring that is based on lab data and AI prediction. It “knows” how your lens should behave based on all the data collected by DxOMark.
The result is that soft parts come back to life. Grass, leaves, feathers, and tree bark look crisp without looking fake. This is especially helpful when:
- Using wide open apertures (f/1.8, f/2.8)
- When looking at the edges of the frame
- Capturing moving subjects or handheld shots
Lightroom’s sharpening tools can’t match this. Its “Detail” panel boosts edge contrast, but it also raises noise. DxO boosts detail and cuts noise at the same time.
What’s the Same Between DxO and Lightroom?
Both:
- Can work with RAW files from most camera brands
- Apply lens correction and color adjustments
- Let you export to DNG or JPEG for use in other editors
- Can batch-process multiple images
But there’s a key difference: DxO PureRAW is not an editor. It’s a pre-processor. You use it first, then move to Lightroom or Photoshop for fine editing.
Think of it like this: Lightroom starts from the camera’s file and tries to fix problems. DxO starts by removing the problems before you even begin.
How to Use DxO PureRAW in a Lightroom Workflow
It’s simple. Import your RAWs into DxO PureRAW. Choose “DeepPRIME” or “DeepPRIME XD.” Then export to DNG. Open those DNGs in Lightroom.
From there, you can still use Adobe’s color profiles. But the hard work—noise, blur, softness, and lens flaws—is already done. Your edits will go faster because the base file looks better.
Here are the Images and Comparsions Using Lightroom and DxO for Lens Correction and De-noising.
You have seen the full size RAW file. Here is that file when run through Lightroom Classic with lens correction and denoise.

Now, the same image, when run through DxO with the softness compensation set to strong, vignetting, chromatic aberration, and lens distortion set to image cropped to the original ratio and returned as a DNG before exporting from Lightroom as a JPEG. (All settings were set to default before running through DxO.

View Both at Once
Here are both on a split screen. The Lightroom image is on the left and DxO on the right.
I brightened up the images and added some contrast – copied the settings and pasted them to the other image so both have the same edits.


Do You See a Difference?
The noise correction looks about the same to me. But you can see how the DxO edited image is much clearer and in focus, and takes on better contrast adjustments than the Lightroom corrected image.
What difference do you see? Leave a comment below.
DxO PureRAW vs. Adobe Camera Profiles—Who Wins?
For pure RAW processing, DxO wins in these areas:
- Noise reduction – Much cleaner, more detail.
- Lens correction – Based on lab data, not general profiles.
- Sharpness – Recovers softness across the frame.
- Clarity – Results look clean, not overcooked.
Adobe wins in:
- Speed – It’s faster to stay in Lightroom.
Workflow – Fewer exports, simpler process.
If you shoot in good light at ISO 100, Adobe may be enough. But for challenging shots—low light, wide open, zoom lenses—DxO gives better results.
Lightroom is still the best tool for organizing, editing, and exporting your photos. DxO PureRAW just gives it a better file to start with.
The ideal combo:
- Shoot in RAW.
- Run files through DxO PureRAW.
- Import the DNGs into Lightroom.
- Edit color, crop, tone, and finish.
You’ll spend less time fixing problems and more time making your photo shine.
My Final Thoughts on the Lightroom and DxO Comparison
Nature photos often push your gear to its limits. Deep shadows, fine details, tricky focus, all of these things test your camera and lens.
In my opinion, DxO PureRAW helps your files hold up. It saves shots that might otherwise look soft or noisy. It makes average lenses look great or at least better. It gives Lightroom or Camera Raw a stronger starting point.
It’s not perfect. It’s not fast. But it works.
If your photos have soft corners or noise, try PureRAW. You’ll see the difference in seconds.
What I Didn’t Touch On and I’m Willing to Help You
One thing I didn’t talk about was the added cost.
DxO PureRaw 5 – the current version- is $129 lifetime without any deals. It is extra money, I know. But for me, it’s worth it because my lens and camera kit aren’t sharp. I use PureRaw 4 and didn’t upgrade. The upgrade would have been $79 early, and now I see it is $89 to upgrade.
I didn’t see the need, as it works well enough. I also am not sure when I get a newer camera and lens if I will need it to use it. Lightroom De-noise works well enough. It is the lens correction and softness features of DxO that I need.
So, because of that, if you want to see how well DxO works with your camera and lens kit, send me an email or leave a comment below, and we will work out a way where you send me a RAW file and I’ll run it through DxO PureRaw 4 and send you back the corrected file so you can decide for yourself.
Let me know your thoughts!
Very nice objective review! After researching this myself, I feel the drew the same conclusions. Thank you for taking the time to document your finding!