

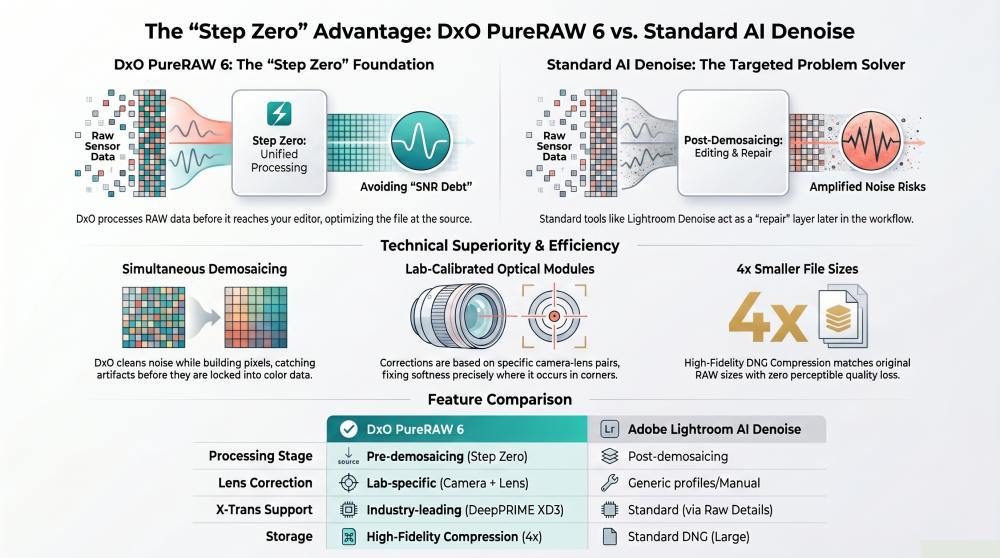
DxO PureRAW 6 brings DeepPRIME XD3 to Bayer sensors, introduces high-fidelity DNG compression using JPEG XL, and adds AI-powered dust removal and local masking. For Fujifilm X-Trans shooters who already had XD3 in version 5, the biggest practical win is compression — cutting Linear DNG file sizes by roughly 3.5 times without measurable quality loss.
If you’ve read the earlier work here on DxO PureRAW vs Lightroom lens correction and how DeepPRIME handles denoising differently from Lightroom’s AI Denoise, you already know the foundational argument for using PureRAW as a pre-processor. This article doesn’t re-litigate that case. It evaluates what version 6 specifically adds — and whether it changes the upgrade decision.
I shoot a Fujifilm X-S10 with the 16-80mm kit lens. That lens is soft in my experience from roughly the mid-corners outward, across most of the focal range. Optical correction is the main reason I started using PureRAW in the first place, and it remains the core reason I keep using it. Version 6 brings several meaningful additions on top of that foundation.
For photographers using optically softer glass, PureRAW corrects corner softness more precisely than Lightroom’s profile-based approach across the full focal range.
What Actually Changed in Version 6
The headline feature is the extension of DeepPRIME XD3 to Bayer sensors that Nikon, Canon, and most of the Sony cameras use. For Fujifilm X-Trans shooters, that engine was already available in PureRAW 5. The upgrade story for existing X-Trans users is the other additions: high-fidelity DNG compression, AI dust removal, local masking controls, and the V2 lens sharpness optimizer.
Two of those — compression and XD3 for Bayer — are the ones that change the workflow in a meaningful way. I’ll cover all of them, with my own test results where I have them.
DeepPRIME XD3 for Bayer Sensors
Traditional RAW conversion software handle demosaicing, noise reduction, and chromatic aberration correction in sequence — each module unaware of what the previous one produced. Errors introduced during demosaicing, such as moiré in fine repeating patterns, are amplified by the noise reduction stage rather than corrected.
If you are unfamiliar with what the Bayer Sensors are or what camera systems use a Bayer Sensor I have included a list at the end of the article.
DeepPRIME XD3 processes all three tasks simultaneously within a single convolutional neural network, trained on matched pairs of raw sensor data and high-fidelity reference images. According to DxO’s internal documentation, development involved evaluation of over 50 neural configurations at approximately three years of cumulative H100 GPU compute time .
XD3’s joint-processing architecture was previously limited to Fujifilm X-Trans sensors; version 6 extends it to the Bayer-pattern sensors used by most other manufacturers.
In plain English: Instead of fixing noise, then sharpness, then color fringing in three separate steps — where each correction can undo part of what the last one did — XD3 addresses all of it at once. For Bayer-sensor shooters, this is now available for the first time.
For X-Trans shooters, XD3 was already running in PureRAW 5. The practical question for existing Fujifilm users is what else version 6 brings — and the answer is mostly compression and the upgraded lens sharpness optimizer. The demosaicing differences between converters matter most at the RAW interpretation stage, which is exactly where PureRAW operates.
Lens Sharpness Optimizer V2 and the 16-80mm Problem
The 16-80mm is a competent lens in the center of the frame, but it softens noticeably toward the corners. That’s not unusual for a kit zoom — it’s a physics trade-off. What PureRAW does is apply correction based on DxO’s own laboratory measurements of that specific camera-lens combination, not metadata the manufacturer embedded in the raw file.
How the Correction Works
DxO quantifies lens softness using a proprietary metric called the Blur eXperience Unit (BxU). For each camera-lens combination, the laboratory maps the optical point spread function — how much the lens blurs an ideal point of light — at every focal length, aperture, and position across the sensor plane.
The Lens Sharpness Optimizer V2, introduced in PhotoLab 9 and carried into PureRAW 6, applies spatially variable correction using this data: soft corners receive stronger reconstruction than the already-sharp center. According to DxO’s internal documentation, V2 also normalizes correction strength based on baseline lens quality — a modern high-performance prime receives a lighter touch than a budget telephoto zoom, preventing over-sharpening of glass that doesn’t need it.
In plain English: PureRAW doesn’t apply the same sharpening across the whole image. It maps where your specific lens goes soft and corrects only those areas. V2 also adjusts how aggressively it corrects based on how good your lens is to begin with.
In practice on the 16-80mm, the corner softness visible at wider apertures is measurably reduced after PureRAW processing. Distortion correction is applied across the focal range — something Lightroom’s profile-based correction handles less precisely because it relies on manufacturer-provided metadata rather than lab-measured displacement data.
Whether V2’s normalization produces a visible difference over the previous version on this specific lens is harder to assess. The changes are incremental at the settings I use, but the underlying approach remains the strongest argument for PureRAW over Lightroom for optically softer glass.
The two images below are a 100% crop comparison of Fujifilm X-S10 corner sharpness with 16-80mm lens (shot at 35.8mm), showing before and after DxO PureRAW 6 Lens Sharpness Optimizer V2 correction, illustrating the reduction in edge blur and improved micro-detail.
The first is exported from Adobe Lightroom unedited RAW file with the Adobe Neutral profile. The second image is the same image processed with DxO PureRAW 6 with a sharpness correction of 150% exported back to Lightroom and out again with the same settings as the original.
Although it is hard to tell in these Jpeg images, there is more contrast, sharpness, and definition in the lower DxO processed image especially in the foreground and mid-ground. The RAW image from the camera has more color in the sky (though a bit muddy), but the colors recover in the DxO processed file during editing.
Get an email when new articles are published
High-Fidelity DNG Compression — The Feature That Changes the Storage Equation
This is the most practically significant addition in version 6 for photographers who use Linear DNG output as a standard step. Linear DNG files from previous PureRAW versions were large — typically three to four times the size of the original camera file. That file-size cost has been the main logistical argument against adopting the Step Zero editing workflow with Linear DNG as the default output format.
How the Compression Works
PureRAW 6’s compression operates in two stages.
The first applies Dynamic Range Compression (DRC) — a mathematical redistribution that allocates more bit-depth to shadow information, where precision matters, and less to highlight regions, where the human visual system is less sensitive and where digital sensors record primarily photon noise. According to DxO’s internal documentation, this redistribution is stored using the standard DNG Linearization Table, keeping the file readable by any DNG-compatible application.
The second stage encodes the redistributed data using JPEG XL, a codec designed for 16-bit high-depth image content. JPEG XL uses variable-size transform blocks — 256×256 blocks for smooth gradients like open sky, and 2×2 blocks for high-frequency edges. The result is a standard Linear DNG that opens in Lightroom, Capture One, On 1 Photo, Luminar Neo without special handling.
In plain English: PureRAW finds and compresses information in your file that your eye can’t meaningfully perceive anyway — particularly in bright areas — then uses a modern codec to store what remains far more efficiently. The smaller file opens in your editor exactly the same way.
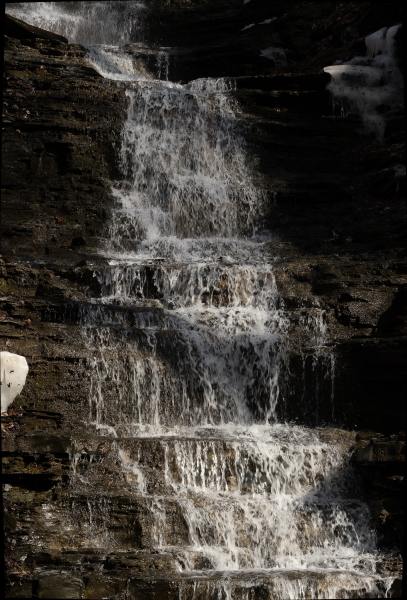
I ran my own test with a waterfall image from the X-S10 — 26 megapixels, processed through PureRAW 6 with identical settings for both exports. The results are posted below.
103 MB
Uncompressed Linear DNG
29 MB
High-fidelity compressed DNG
3.55×
Actual reduction (X-S10, 26 MP)
DxO’s internal documentation claims a 4x reduction based on a 50-megapixel sensor example. My result on a 26-megapixel file came in somewhat short of that. The gap likely reflects sensor resolution differences — with more pixels, there’s proportionally more redundant highlight data to remove.
Both numbers are rough benchmarks, not a guaranteed outcome for every file. Independent testing by CaptureLandscapes found compressed DNGs visually indistinguishable from uncompressed versions, including after aggressive shadow lifting.
A folder of Linear DNGs that previously occupied 20 GB drops to roughly 6 GB — without measurable quality loss in normal editing.
Below are two 100% crop views of a waterfall RAW image from the Fujifilm X-S10, no edits were added to the file.
The first is exported as an uncompressed 103 MB Linear DNG and the second as a 29 MB high-fidelity compressed DNG from DxO PureRAW 6, demonstrating no visible quality difference between the two outputs (images exported from Lightroom at 90% quality to a 600 by 400 pixel files).

For landscape photographers storing large volumes of Linear DNG, 3.5 times is transformative. A folder that previously occupied 20 GB drops to roughly 6 GB. Cloud backup costs and sync times follow proportionally.
One compatibility note: community reports on the Darktable forums indicate that older open-source tools may not correctly read the JPEG XL layer — treat that as anecdotal and test against your specific setup before committing to compressed output for an entire catalog. If you use current Adobe Creative Cloud, Capture One or the other major editing brands, the transition is transparent.
For more on where Linear DNG output fits into the editing sequence, the earlier post on the DxO PureRAW and Linear Profiles workflow covers the integration in detail.
AI Dust Removal
Landscape photographers who stop down regularly — f/11 or f/16 for waterfall long exposures, or to get foreground-to-background sharpness across a wide scene — know how quickly sensor dust becomes visible. PureRAW 6 adds automated detection using RF-DETR, an object detection model that scans the image without requiring manual spot-clicking on each artifact.
According to DxO’s documentation, the model was trained on millions of synthetically generated dust spots with randomized shapes and edge blur, specifically to distinguish dust from fine image content — a distant bird, a star. A sensitivity control adjusts the detection threshold. Higher sensitivity catches near-transparent spots but increases the risk of false positives in heavily textured areas.
I haven’t encountered false positives in my use, but I’d recommend reviewing results on images with fine repetitive texture — lichen on rock, for instance — before committing to unsupervised batch processing across an entire shoot. Lightroom, ACR, and plugins for Photoshop do a great job with dust removal so I click this feature off on DxO PureRAW 6.
Local Masking
PureRAW 6 adds a local adjustments framework for applying different processing settings to different image areas. The most useful case: aggressive XD3 denoising on a sharp subject while leaving a smooth bokeh background at lower intensity, preventing the over-processed look that global sharpening can introduce in out-of-focus regions.
The scope is worth stating plainly — this masking system controls the intensity of PureRAW’s own corrections only: denoising strength and lens sharpening. It doesn’t perform tonal or color adjustments. Semantic AI masking across image categories lives in DxO PhotoLab 9, not PureRAW.
Workflow — Where PureRAW 6 Sits in the Sequence
Nothing changes about where PureRAW fits in the editing sequence. It runs before your primary editor, after import, as the first step in a Step Zero editing workflow. You select your files, send them to PureRAW, and the processed DNGs are returned to your Lightroom catalog with metadata intact. From there the linear DNG workflow proceeds exactly as before.
Compressed output integrates transparently into Lightroom and Capture One on current software versions. Smaller files move faster through import and catalog sync, and take up less room on drives that are probably already crowded with previous exports.
Is the Upgrade Worth It?
X-Trans shooters on PureRAW 5
Compression alone justifies the upgrade if you store significant volumes of Linear DNG output. A 3.5x reduction on 26-megapixel files is real and immediately useful (larger megapixel cameras may see a greater reduction!). Add dust removal and you’ve removed two recurring friction points from the workflow.
Bayer-sensor photographers on PureRAW 4 or earlier
XD3 is the main event. Independent testing by SLR Lounge confirmed better fine-detail rendering at high ISO than the previous DeepPRIME line, particularly in feathers and foliage. Compression makes Linear DNG as a standard step far more practical.
Bayer-sensor photographers on PureRAW 5
XD3 access is new for you in version 6. Combined with compression and dust removal, the version-6 feature set is a meaningful difference from version 5 — not just an incremental update.
Compression alone justifies the upgrade for X-Trans shooters — a 3.5x reduction on 26-megapixel files is immediately useful, and the quality difference is imperceptible.
Save 15%
Use Coupon Code
MARSH
to save 15% on any DxO software for new customers!
Visit DxO
Conclusion
PureRAW 6 doesn’t change the fundamental argument for using a dedicated pre-processor before your primary editor. What it does is remove the two most common objections to that workflow: the denoising quality gap for Bayer-sensor users, and the file size cost of Linear DNG output. If either of those objections has been holding you back, version 6 resolves both.
The 16-80mm is still soft in the corners. PureRAW still corrects it better than Lightroom’s profile-based approach. That hasn’t changed — it’s just now accompanied by files that are a fraction of the size they used to be.
FAQ
What DeepPRIME engine should I use for my Sony, Nikon, or Canon camera?
Start with DeepPRIME XD3 for any high-ISO file or image with fine texture detail. Use DeepPRIME 3 when processing speed matters more — it’s faster and produces excellent results through ISO 6400.
How does high-fidelity compression affect editing in Lightroom?
It doesn’t. Compressed DNGs open and behave identically to uncompressed files in current Lightroom Classic. All sliders, masking tools, and export options function normally. No special steps are required.
Should I use compressed or uncompressed DNG output from PureRAW 6?
Compressed unless you use open-source tools like Darktable, which community reports indicate may not read the JPEG XL layer correctly. For Adobe and Capture One users on current versions, compressed is the better default — same quality, a fraction of the storage.
Does PureRAW 6 replace Lightroom or Capture One?
No. PureRAW is a pre-processor — it improves the DNG your primary editor receives, then hands that file off. Lightroom or Capture One still handles all creative editing: exposure, color, masking, and export.
What do the Luminance and Forced Detail sliders do?
Luminance controls how aggressively PureRAW removes grain. Lower settings preserve natural texture — useful for portraits. Forced Detail controls how much the neural engine reconstructs fine patterns near the noise floor. Keep it moderate on very noisy files to avoid false detail.
References
- CaptureLandscapes. “DxO PureRAW 6 Review: Is It Better Than Lightroom or Topaz?” CaptureLandscapes. https://www.capturelandscapes.com/dxo-pureraw-review/ (2026)
- SLR Lounge. “DxO PureRAW 6 Review: The Best RAW Data From Your Image Files.” SLR Lounge. https://www.slrlounge.com/dxo-pureraw-6-review/ (2026)
- Amateur Photographer. “Get Your Best-Ever RAW Files, Faster, with DxO’s Latest Image-Processing Software.” Amateur Photographer. https://amateurphotographer.com/latest/photo-news/new-dxo-pureraw-6/ (2026)
- Edwards-X, J. “A Deep Dive into DxO PureRAW 6.” Julie Edwards-X Photography Blog. https://julieedwards-x.blog/2026/03/16/a-deep-dive-into-dxo-pureraw-6/ (2026)
- DxO. “New DxO PureRAW 6 Brings DeepPRIME XD3 for Bayer.” DxO News. https://www.dxo.com/news/introducing-pureraw-6/ (2026)
- DxO. “DeepPRIME XD3: Fourth-Generation AI Denoising and Demosaicing.” DxO News. https://www.dxo.com/news/deepprime-xd3-fourth-generation/ (2026)
- DxO. “How DxO’s Pioneering Approach Makes DNG Files Four Times Smaller Without Impacting Quality.” DxO News. https://www.dxo.com/news/dng-compression/ (2026)
- DxO. “DxO’s Approach to Lens Sharpness.” DxO Technology. https://www.dxo.com/technology/lens-sharpness/ (2026)
- DxO. “Automatic Dust Correction in Digital Photographs.” DxO News. https://www.dxo.com/news/automatic-dust-correction/ (2026)
- discuss.pixls.us. “New DXO Pure Raw 6.” Darktable Community Forum. https://discuss.pixls.us/t/new-dxo-pure-raw-6/56403?page=3 (2026)
What is a Bayer Sensor and Who Uses Them?
The Bayer sensor (or more accurately, the Bayer Color Filter Array) is the industry standard. It is used by the vast majority of digital camera manufacturers because of its efficiency in mimicking human visual sensitivity to green light.
The Bayer sensor is a digital image sensor that uses a mosaic of color filters—specifically a grid of 50% green, 25% red, and 25% blue—to mimic the color sensitivity of the human eye. This specific arrangement allows the sensor to capture luminance data through the green pixels while a demosaicing algorithm reconstructs full-color information for every pixel in the final image.
While you are very familiar with Fujifilm’s X-Trans alternative, almost every other player in the market sticks to the Bayer pattern.
1. Mainstream Full-Frame & Crop Systems
Nearly all cameras from the “Big Three” and their competitors utilize Bayer sensors:
- Sony: Every Alpha series camera (a7, a9, a1, a6000 series) uses a Bayer filter. Even their “Quad Bayer” sensors in high-resolution phones and some video-centric bodies are variations of the standard Bayer design.
- Canon: All EOS R-series mirrorless and EOS DSLR cameras.
- Nikon: All Z-series mirrorless and digital SLRs.
- Panasonic: Both their Micro Four Thirds (Lumix G) and Full Frame (Lumix S) lines.
- OM System (Olympus): All OM and PEN models.
- Leica: Most models (M11, Q3, SL3), with the notable exception of the Monochrom variants, which have no color filter at all.
2. Medium Format Systems
The high-end landscape and studio market is also dominated by Bayer:
- Fujifilm GFX: Unlike their APS-C line, Fujifilm uses Bayer sensors for the GFX 50 and 100 series. They have stated that the larger sensor area and high pixel count make the complexity of X-Trans unnecessary for moiré control in medium format.
- Hasselblad: The X2D and V-series digital backs.
- Phase One: The IQ series backs.
3. The Exceptions (What is NOT Bayer?)
To understand the Bayer landscape, it helps to see the few systems that avoid it:
- Fujifilm X-Series: Uses the X-Trans pattern (a $6 \times 6$ grid vs. the Bayer $2 \times 2$ grid) on most APS-C models to reduce moiré without an optical low-pass filter.
- Note: Even Fuji uses Bayer in their entry-level X-series (like the X-T200) and the GFX line.
- Sigma: Uses the Foveon X3 sensor, which stacks colors vertically rather than using a mosaic grid.
- Monochrome Cameras: Leica M Monochrom or Pentax K-3 III Monochrome. These have the filter removed entirely to capture pure luminance data, requiring no demosaicing.