
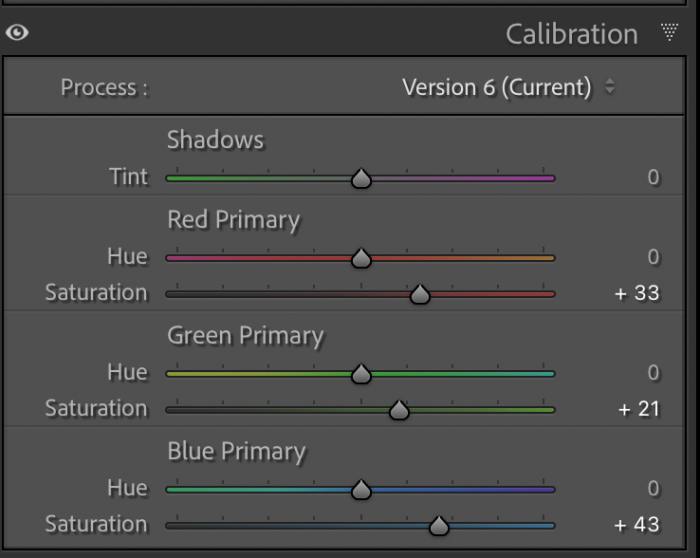
The Lightroom Calibration panel redefines the underlying mix of Red, Green, and Blue data in every pixel of your RAW file. Unlike the HSL panel, which sorts colors by appearance, Calibration shifts the color “DNA” of the entire image. This creates a more integrated look for landscapes, especially when utilizing the modern Process Version 6 engine to prepare files for HDR rendering.

The digital imaging pipeline from your camera’s sensor to a rendered RAW file involves a sophisticated series of mathematical translations. Within the Adobe Lightroom and Adobe Camera Raw (ACR) ecosystem, the Calibration panel represents the most fundamental layer of this transformation.
Mastering this panel is essential for achieving a refined aesthetic, especially for the landscape photographer dealing with subtle atmospheric gradients. Adjust your Calibration first to set a solid foundation before you begin the Base Tone Method for Lightroom.
The Evolution of Calibration: From Correction to Creativity
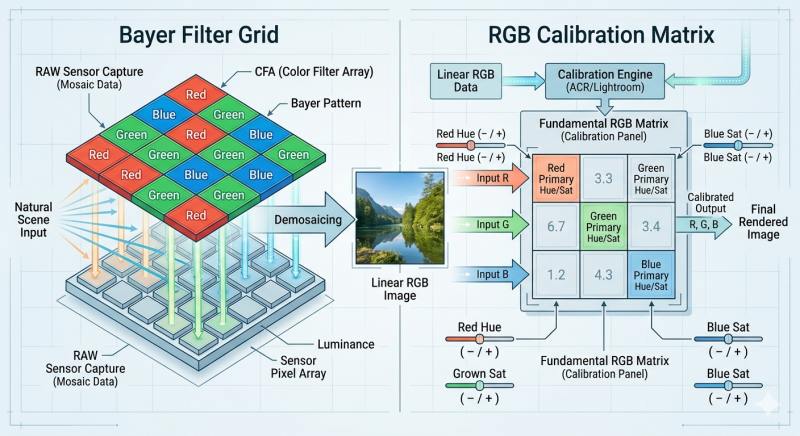
In the early stages of Adobe Camera Raw, developers introduced the Calibration panel for technical correction rather than creative expression. Every camera manufacturer utilizes a unique Color Filter Array (CFA) and proprietary digital signal processing (DSP) to convert electrical charges into a visible RGB image.
Because no universal standard exists for mapping electrical charges to specific colors, different camera brands produce distinct “color sciences.” Calibration originally allowed photographers to micro-adjust how the RAW converter interpreted a specific sensor.
As the software matured, Adobe introduced “Camera Matching” profiles that automated this foundational work. I covered these in detail in my guide on Lightroom and Camera Raw Profiles Explained. While modern profiles have superseded the technical need for sensor correction, the panel remains a fixture because it offers a unique method of manipulating the fundamental color mix.
Redefining the RGB Blend
The Calibration tool operates at the substrate level of the image processing stack. It utilizes a 3×3 matrix multiplication to redefine the relationship between captured sensor data and the final RGB output. When you adjust a slider in this panel, you change the “recipe” for every pixel in the frame. A pixel perceived as pure green actually contains a specific mathematical ratio of all three primaries. Shifting the “Red Primary” hue alters the red data residing inside that green pixel, causing a global shift in the color gamut.
Process Version 6 (Current) enhances this by integrating this 3×3 mapping with the latest AI-driven Point Color engine. This ensures that substrate-level primary shifts do not conflict with perceptual color separation, particularly in the expanded luminance range of HDR (High Dynamic Range) files.
In Plain English: HSL picks up a specific colored crayon. Calibration changes the actual pigments in the wax used to make the crayon. It affects the “hidden” colors inside every tone, creating a smoother, more unified look across the entire photograph.
HSL vs. Calibration: Perceptual vs. Substrate Manipulation
The primary technical distinction of the Calibration panel lies in its level of operation. While both panels feature similar-looking sliders, they operate on different principles.
HSL: Perceptual Color Sorting
The HSL panel acts as a “sorter.” It identifies pixels the human eye already recognizes as a specific color. If you move the Red saturation slider in HSL, Lightroom only targets pixels it deems red. It does not affect the rest of the image. This makes HSL a surgical tool for refining specific objects, but it remains blind to the “hidden” color components of other pixels.
Calibration: Universal Redefinition
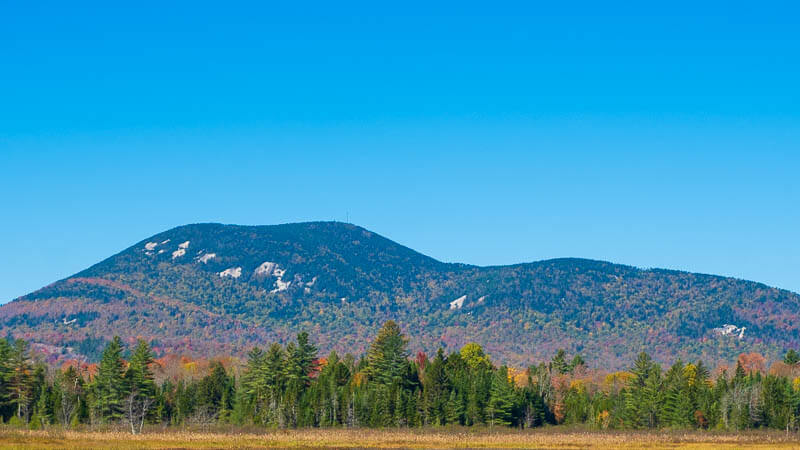
The Calibration panel manipulates the global definition of the Red, Green, and Blue primaries regardless of what color a pixel appears to be. During testing on high-contrast sunset files from the Adirondacks using my FujiFIlm X-S10, I found that boosting “Blue Primary” saturation added a richness to the warm oranges of the sky that HSL could not reach. Those orange pixels contain a tiny percentage of blue data that Calibration enhances, creating a more “integrated” vibrancy. The cover image of this article demonstrates the color change.
Process Version 6: The Modern Engine
The Calibration panel also dictates the “Process Version” (PV) used by Lightroom. Adobe has updated this engine several times; each version handles highlights, shadows, and color gradients differently.
- Process Version 6 (Current): The standard for modern RAW editing. It is required to enable the Point Color tool in the Color Mixer panel and provides the math necessary for HDR Output.
- Process Version 5: Previously the standard, it introduced advanced algorithms for highlight recovery and shadow detail preservation.
- Legacy Versions: Primarily preserved for backward compatibility. Switching an older image to PV6 often provides an immediate improvement in the dynamic range and color depth of a high-contrast mountain scene.
Strategic Timing: Where Calibration Fits Your Workflow
The Foundational Approach (Early)
Use the Calibration panel at the very beginning of the process. Because this panel defines the “color space,” adjusting it early ensures that all subsequent edits in the Basic, HSL, and Tone Curve panels build upon a cohesive foundation. This mirrors the philosophy of using Tony Kuyper’s Linear Profiles.
The Polishing Approach (Late)
Use the panel as a “polishing” tool to inject global richness into an already balanced image. Landscape photographers frequently use the Blue Primary Saturation slider here to add a final layer of vibrancy that standard saturation sliders cannot match.
Get an email when new articles are published
Why Use Calibration for Landscapes?
- Unique Vibrance: The Blue Primary Saturation slider increases richness without the plastic look of standard saturation.
- Signature Moods: It establishes a “signature look,” such as the moody, green-tinted shadows common in professional woodland photography.
- Superior Color Extraction: For golden hour shots, Calibration extracts warmth from the sensor’s red sub-pixels that other tools miss.
- Better Color During Dull Periods: The Calibration saturation and hue sliders can bring life to those late autumn and early winter shots with fallen brown leafs.
Potential Problems: Sky Banding and Global Shifts
Calibration is a blunt instrument. The most significant risk involves “channel clipping” in smooth gradients, such as clear blue skies. Aggressive saturation boosts push data beyond the limits of the color space, resulting in ugly, stair-stepped lines known as banding.
In this case, a little is better than more. As colors can turn unnatural and large areas of one color can become banded and create halos if care is not taken.
Because the tool is global, a shift that improves the forest floor might turn the sky purple. If your color issue is strictly local—like one specific flower—reach for the new Point Color tool in the Color Mixer or Masking instead.
Summary of Landscape Calibration Moves
| Landscape Scenario | Recommended Move | Expert Reasoning |
| Dull Sky / Flat Vista | Increase Blue Primary Saturation | Enhances global richness via complementary contrast. |
| Neon / Synthetic Greens | Green Primary Hue toward Yellow (+) | Corrects sensor over-sensitivity to green wavelengths. |
| Golden Hour Sunrise | Increase Red Primary Saturation | Extracts built-in warmth from the sensor’s red sub-pixels. |
| Cinematic Woodland | Shadows Tint toward Green (-) | Creates a moody, filmic cast in dark tones. |
| High Contrast / HDR | Update to Process Version 6 | Enables superior rendering and Point Color precision. |
FAQ: Common Questions on Calibration
Q: Why does the Calibration panel not appear for my JPEG files?
A: Calibration works with the linear data of a RAW file during the demosaicing stage. JPEGs have already “baked” the color data into a specific space, so Lightroom restricts this panel to an “Embedded” profile.
Q: Does Process Version 6 affect my existing edits?
A: If you update an old photo from PV5 to PV6, you may see subtle shifts in color rendering, particularly in saturated areas. However, PV6 is non-destructive and is required if you want to use the new Point Color features.
Q: Can I use Calibration on Lightroom Mobile or the iPad app?
A: No. Adobe only includes the Calibration panel in the desktop versions of Lightroom Classic and Adobe Camera Raw. Edits made on desktop will sync to mobile, but you cannot adjust the sliders there.
Q: Should I use Calibration if I already use a Linear Profile?
A: Yes, but keep adjustments subtle. Stacking two foundational color tools can sometimes push magentas into clipping. Use Calibration to refine the look, not to rebuild it.
References
- Adobe Systems. (2024). Digital Negative (DNG) Specification (Version 1.7.1.0). Adobe Help Center.
- Cambridge in Colour. Understanding Gamma Correction and Bit Depth. cambridgeincolour.com.
- Benz, G. Extract Insane Color with Camera Calibration. gregbenzphotography.com.
- Marsh, T. (2024). The Base Tone Method: Why Setting Your White and Black Points Is a Trap. toddmarsh.com.
- Adobe Support. Process Versions in Lightroom Classic. helpx.adobe.com.